

April – end of month review
April feels like it’s lasted forever – it’s not dragged in a bad way, just seems about four years since the end of March and the drama production (which finished on 9th April).
April has been a glorious month – gorgeous weather just about every day. *Too* glorious – there haven’t been any April showers around here and it’s mighty dry. I don’t want May or the summer to be a complete wash out but I wouldn’t mind the odd wet day.

Goals in 2011 progress
Since we’re a third of the way through the year, I’ve written a full update on my personal goals over on my blog. Out of the 11 goals and five sub-goals listed over there, I’ve completed one goal (and one sub-goal), six (and two) are in progress, and four (and two) are still to do.
I haven’t really made any separate progress on my additional Really Good Life goals – am reviewing them now to see what I can do over the next month.
Buy less than 12 items of clothing in 2011
Amazingly, I’ve still not bought anything – I’m genuinely shocked! I’ve online window shopped a couple of times – adding things to my basket but then forcing myself to wait until the next day to actually buy it. Each time I’ve been less enthused to finish the order the next day and just closed the tab instead. Saved a lot of money!
After March’s drawers sort through, I went shopping in my wardrobe for shirts in April – reminded myself what I had and found out what fit and what didn’t. I actually ended up getting rid of half the shirts in my wardrobe but have worn the remaining ones more since then so I actually feel like I’ve added to my options by doing that.
Growing stuff and the chickens
Read MoreOur long weekend
Cor, I feel like I’ve not written here for weeks! Like Christmas, Easter doesn’t mean anything to us here – not even the consumption of chocolate – so we’ve just had four days of doing nothing. Well, not doing nothing…
On Friday, I spent a lot of time reading about Square Foot Gardening. It’s something I’d heard vaguely about before and suspected I’d borrow it’s spacing principles when sowing/planting in my various wooden planters, but Friday was the first time I sat down and read about it. Then fully converted to the idea, I built a 3ftx3ft raised bed from our old bathroom cupboard doors (4ftx4ft is more typical but my doors were 6ft tall so 3ft-square was easier and also tucked away better into a space next to the pond).
I reused the former hinge screws to mark out every foot around the frame, so I could easily divide it into those magic foot square sections with twine. I haven’t decided exactly what I’ll plant in it yet but looking at the planting guidelines, my nine squares could be a rather productive space.

We did have a rather lazy day on Saturday – mostly reading in the sun – but Sunday was productive again: we painted the bathroom. I’m holding off talking about our bathroom renovation until its finished (two long months and counting) but I will say, it’s now rather blue.

It needs some more filling/sanding then a second coat, but it’s feels like it’s finally starting to come together. Hurrah.
Yesterday, we had the bathroom flooring fitted (hence the rush to paint at least one coat on the walls on a sunny Sunday) then went for a dog walk at Shipley Glen. When we came back, I pottered in the garden – chicken chores and potting on (the third batch of tomato plants, the two types of courgette, some lollo roso lettuces). I’ve decided that I’m not allowed to sow any more stuff until I’ve dealt with the stuff currently growing – stuff that needs pricking out or potting on – so I don’t get overwhelmed and leave things in too small pots for too long, as happened at some points last year. I can’t wait until stuff can be planted out in the garden en masse though – the greenhouse is just about full of seedlings and the sun porch is pretty packed too. It would also be useful to be able to start clearing space in the salad troughs/pots – grow faster lettuces, I want to eat you!
On the chicken front, Ginger is still broody – I’m kicking her out of the nest box whenever I go down there to make sure she gets food and water regularly, and I’m getting some harsh bwarking in return. I think I managed to talk Blacks out of following her though – she was acting a little hot & bothered for a couple of days but I cooled her down a bit and she’s back to normal and laying again now.
And while we were down near the chickens yesterday, John spotted what he called “the biggest mushrooms I’ve ever seen in my life” – a slight exaggeration maybe but they are pretty sizeable:

They’re on the tree trunk marking the division between our and our neighbour’s gardens and since we walk past there at least once a day, I’m pretty surprised how they got so big without us noticing. I think they’re Dryad’s Saddle (Polyporus squamosus) – edible but only really when they’re young. These guys are probably past it now but I’ll keep an eye out for future fruiting.
So our four-day-weekend was a decent combination of laziness and productivity, how was yours?
Read MoreCharity shopping, planting and making – my fun weekend :)
Last night on Twitter, I asked people to put their hands up if they’d had a lovely afternoon in their garden/at their allotment yesterday and I got a sea of hands waving back – it is really bloody lovely out there at the moment, isn’t it?*
On Saturday, I blew my no spending month thing out of the window by going to a craft sale at Kirkgate Studios in Shipley – well, actually, I only bought two balls of wool and a postcard from there but since I was in Shipley… As with most poorer areas, you’re less likely to find exclusive designer goodies going for £1 but with eight charity shops, there is at least plenty of choice.

I bought 13 books. Thirteen! But 10 of them were (drama) work-related and two Monica Dickens books I’ve been considering buying off Amazon/Abebooks for a couple of months, so it wasn’t all spur-of-the-moment spend-spend-spend. Plus, eight of the books were in a 4-for-£1 offer so all 13 books cost £7.70 in total — not too bad. (And I’ve already found seven books to give away under my “buy 2, get rid of 1 old one” rule.)

I also bought a cute small plate to be our kitchen soap dish for 50p, another little dish for 50p because it was a tourist souvenir from Baghdad (and how often do you see those?) and a fake-patchwork duvet cover for £1.50, which I’ll turn into a cheat quilt like Lynsey’s from SwirlyArts made this time last year — again, something else I’ve been looking out for because I love Lynsey’s quilt so I was very happy to find it :)
Anyway, after all that spendery on Saturday, I declared Sunday would be a day for the garden. I didn’t get as much done as I’d hoped (I’ll have to have some time off this week to get the rest finished) but I potted on lots of tomatoes & pumpkins, sowed nearly all my potatoes as well as more lettuce & annual herbs. I also made two new scrap wood planters – not the prettiest but certainly the easiest ones yet.

I believe the sides are old scaffolding planks or similar — John’s dad had a trailer full when we went over the other day. He said “they’ll be great for burning” until he saw me hugging them to my chest and squealing with planter-building delight. They’re about 3ft by 1ft by 8inches deep, with reclaimed decking for the bottom supports. Again, they’ll be lined but I think I’ll see how far I get cleaning them rather than painting them as I like the character of the wood. (Apologies for the somewhat shadowy photo – was in a hurry, camera battery was dying.)

I also made some super quick wire wall mounts for some herb pots in the greenhouse – I’ve run out of room on my staging/the floor at the moment so wanted these little pots (and five with baby sage seedlings in them) out of the way. I’ll have to make sure they don’t dry out too much but they’ll probably be fine for now.
Oh, and I also cleaned the windows for the first time this year on Saturday evening – they were, as you may expect, rather filthy but I did a rather good job, even if I do say so myself – not a single water spot in sight! ;)
* (People in parts of the US still in the soggy tailend of winter and people in the southern hemisphere who are heading into full on winter – sorry to gloat about our sunshine. We’re just not used to this nice weather in the UK and you know, talking about it is our national pastime.)
What did you get up to this weekend? Any frugal fun? Or planting progress?
Read MoreUsing our homemade olive oil soap
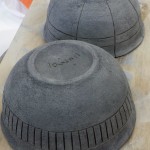
Last week, we started using our homemade olive oil soap.

You might remember I spent A MILLION HOURS waiting for the damn thing to trace back in February but didn’t think it would work because it was sloppy in the moulds for a few days. Then it started to solidify and I did a happy dance.
So, anyway, after a few more weeks of curing/drying, we started using it last week. I went with one of the 100% olive oil ones, not the one-third olive oil, two-thirds other veg oils (more on those later when we try them).
I was really paranoid at first – worried it would be too caustic or something – so made sure to scrap off the bits of white powder (soda ash) from the edges, rather than just washing it off. Cavitch’s troubleshooting guide says to beware of “excessive” white powder as that can indicate too much lye or hard water has been used – but I don’t think my white powder was “excessive”, just some.
The soap is very pale – almost pure white. Apparently the better quality of olive oil, the paler the resulting soap. My olive oil (which came from Netto) claimed to be extra virgin so this fits. It has quite a neutral smell – slightly olive oil-ish but nowhere near as strong as the olive oil I started with. It’s pretty hard now and doesn’t lather much at all – but that’s expected with pure olive oil soap and the latter isn’t a huge problem as it’s not like we’ll be using it as shaving soap or anything like that.

So anyway, the verdict. It feels nice to use – smooth and silky, and no alkaline burns at all – always a good thing in a soap ;). Because of the play and stuff last week, I haven’t actually got my hands that dirty since we started using the soap so can’t comment on the actual cleaning properties but it leaves my skin feeling clean – and … not “squeaky”. I don’t know how to describe it but whenever I usually use normal bar soap, my skin feels “squeaky” afterwards – presumably either dryness or some sort of residue. That isn’t a problem with our olive oil soap – even when I washed them five times in a row to double-triple-quintiple check that it wasn’t too caustic (yes, really overly paranoid).

As I said explained in my last soap post, we’re not interested in pretty or pleasantly perfumed soaps – we want them to clean us, be long lasting, to have an inoffensive smell, create minimal waste and be frugal. The hardness of this soap means it doesn’t turn to mush in the soap dish and the only waste produced were two plastic bottles (which can be recycled – but one of which was actually reused as a soap mould first).
As for the frugalness, I had used this recipe and method which called for 1 litre of olive oil, 126g of caustic soda and 300g of water. I paid £2.52 for the olive oil from Netto, about £1.50 (I’ve lost the receipt!) for 500g of caustic soda from Wilkinsons (so about 38p for the amount I used) and tap water (which is effectively free), so the consumables cost around £2.90 for the batch. (I did buy a pan and steel dish to use too – but they’ll be used again for soap making and other non-foody pursuits (such as dyeing) so I considered them a general craft supply costs rather than including them in these figures.)
Weighing it just now, I’ve got around 1050g of dried, ready-to-use soap – or 35p per 125g bar — my bars differ in sizes (from about 50g, for the ones from the fruit tray mould – as seen in the pictures – to about 125g for ones shaped in an old mini roaster tray) but that’s the size of a bar of Oliva soap, which is the 100% olive oil soap we’d used previously, so is a good comparison. Oliva usually costs about £1 a bar.
All in all, I’m glad I tried it and I’m very happy with the result – but it was a bit of a faff. I think I did the right thing by processing two loads of soap on the same day so made economies of scale re: faffiness. Hopefully the soap we’ve got now will last us about a year – I’d happily do it once every six months or a year but I couldn’t be bothered doing it much more frequently than that.
Read MoreMore scrap wood planters
These are WIPs rather than finished articles but I wanted to mention them anyway because it’s pretty much all I achieved over the weekend – I had a nice quiet weekend, just not as productive as normal.
On Friday afternoon, I had that “I must make!!” craving so I went to hunt around in the (supposedly for burning) wood store for scraps to planters – I found 30 plank offcuts, roughly the same length (about 25cm/10ins) and width (13cm/5ins) and 12 batten offcuts, about 15mmx30mm. I’d intended to make another long trough but I realised those pieces would make three 25cm/10inch-cubed planters without having to saw anything at all – win!
(I don’t mind sawing now that we have a decent saw that treats everything like butter – but I like to avoid it whenever I can because I’m lazy and always end up with wonky cuts :) )

As with the other planters I’ve made, these aren’t exactly working examples of right angles or beautiful to look at but they’ll do. They’re finished in terms of building but the planks were all untreated and while I’ll line the inside anyway, I think I’m going to have to treat or paint the outside to make them more weather resistant. As we’re painting the bathroom soon, we should have some paint leftover from that which I can use.
The other planter I started yesterday afternoon before I had to rush off to a not-great dress rehearsal. I went down to the bottom of the garden to look for pallets (to make a vertical planter like the one Emma suggested) but the only ones down there are too big/heavy – but I did find some old, weathered fence boards/paling, which John’s dad had salvaged & brought over at some point, so I decided to make another long trough planter from them. I’ve made up the long sides – using a salvaged/scrap 2by4 cut into quarters for the corner supports/feet – but haven’t attached the short sides or base yet. It’s going to be 120cm/4ft by 60cm/2ft when it’s finished so I might end up removing the feet and resting the base on the floor so it doesn’t have to be strong enough to support all that weight. I’m going to enlist John’s help with fixing on the sides – I’m hoping that two of us working together can actually get the angles square for a change!
While I was doing that yesterday, John was at his mum and dad’s house for lunch and his dad excitedly told him about his latest find for us — apparently the sawmill/joinery place he gets a lot of offcuts from had some 5m (16ft) lengths of decking going begging this week – salvaged from a replacement job or something. According to John, his dad now has a crazy idea for us to make some 5m long planters – that might be a little nuts! Perhaps I should work on my sawing skills after all…
Read MoreAdventures in frugal vertical gardening – ideas for planters?
Got a dull flat wall I’d like to “vertical garden” up – need to make/acquire/modify some planters. Any suggestions? Need to be cheap/free :)
I asked that grammatically horrific question on Twitter last Thursday but I thought I’d bring it over here as well to catch non-Twitterers but also to put together some of my ideas/questions.
I’ve actually got two flat walls that would be perfect for wall planters and the like but I’m going to focus on the bigger one first. It’s on the greenhouse level of our garden and has a super narrow (about a foot wide) bed at the bottom of it. I intended to grow beans and peas in the bed last year – trained up the wall – but the slugs put an end to that. Courgettes grew quite happily in it after all the peas got eaten but I think from this year onwards, it’ll work better as shrubby-herb bed (especially as it means I don’t have to put those elsewhere now). Since they won’t climb up, there will be a lot of vertical height going spare. More of an issue for when I reach the planting stage but if anyone’s interest, the wall is east facing, receiving sun until about 1-2pm.
So what can I use for planters? There are lots of different planters available to buy – in all sorts of materials – but they seem to fall into a few general categories:
- shelves – from basic wood to fancy wrought iron curves & cages. Even the flatter, plainer shelves, usually have a rim or lip around the sides so pots don’t get blown out or down. For use with separate pots.
- window boxes – wall mounted troughs which, unlike the shelves, are planted into directly.
- half moon wall planters – semi-circular troughs a cross between window boxes and hanging baskets.
- hanging baskets – suspended away from the wall on a strong bracket or a hook. A few levels can be hung together like rainchains.
- “floating” pots – either like this lead one from Gardeners World, this integrated hooks/trellis arrangement or just pots on hooks. Some, like the lead one, have pots fixed in position, whereas others can be moved around – for example, pots with individual hooks attached can be put anywhere on a trellis.
- bags – suspended bags filled with soil, with holes cut into the (randomly) bag for the plants. Felt pocket hangers are a cross between the floating pots and these bags. Some bags (like better feather duvets) are divided into different compartments so the soil doesn’t all slump to the bottom – but this does restrict root growth.
- complex living wall systems – patented growing secrets! Lots of different designs/methods – some of them seem to be grid structures filled with compost, others structured bags behind trellis type things, others still who knows? possibly pure magic.
I certainly can’t afford a fancy living wall system but even filling the space with purpose-built troughs/window boxes, wall planters and hanging baskets would cost more than I’d like. (I do have some that I can repurpose from elsewhere in the garden but I’ll have to replace those containers somehow or I won’t be adding to my overall growing space. Some are also self-watering which would be beneficial). As always, I’ll keep an eye out on eBay/Freegle for giveaways but in the meantime, I guess I need to get making…
Read MoreAbout Me
 I'm Louisa and I live a Really Good Life. I grow, I craft, I cook and I make the most of what I've got instead of forever craving more.
Read more the site on the About page, or browse through the categories below.
I'm Louisa and I live a Really Good Life. I grow, I craft, I cook and I make the most of what I've got instead of forever craving more.
Read more the site on the About page, or browse through the categories below. -
 Taking Stock – May 2015
-
 Making a little more progress at the allotment
-
 Allotment, end of round 1 (ding ding)
-
 Yay, allotment!
-
 Taking stock – June 2014
-
 Do it better
-
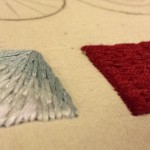
 Stitching etc tips from the Knitting & Stitching Show
-
 No Spend November
-
My winter to-do list 2013
-
 Taking stock: a ‘what I’m up to in my absence’ meme
-
 Plummy solid square crochet blanket
-
 Attack of the Crochet Claw
-
 Using up the glut: Marrow cake recipe
-
Spicy marrow chutney recipe
-
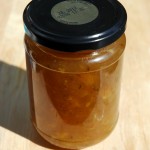
 Wild plum/cherry plum jam recipe
-
 Easy marrow and ginger jam recipe
-
 No omelettes allowed: my five favourite recipes to use up lots of eggs
-
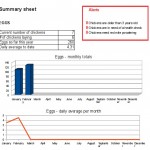 My chicken keeping spreadsheet
-
Plummy solid square crochet blanket
-
 Spicy plum chutney recipe: plum & chilli jam
-
 Foraging for wild food: do you forage near roads?
-
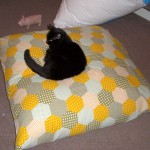 Upcycle an old duvet cover into a frugal bean bag
-
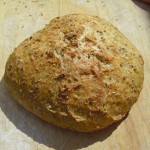 The wonder that is slow rise bread
-
 How I line dry clothes in winter: my top five tips
-
 My low-spend '11: buy less than 12 items of clothing in 2011
-
Cold smoking cheese - taste testing the first batch
-
Using up the glut: Marrow cake recipe
-
How I line dry clothes in winter: my top five tips
-
Spicy marrow chutney recipe
-
 Washing in winter: ideas for reducing laundry?
-
Foraging for wild food: do you forage near roads?
-
Your favourite fiction books with simple living characters/themes?
-
 How I spent my Tuesday afternoon
-
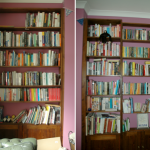 We *heart* books too (warning: picture heavy post!)
-
 Portion control
-
Baking things that'll last
