

Another scrap wood planter
It was too nice today to sit inside – a cold, dull start but warmer this afternoon with some lovely soft winter sun lighting up the trees in the wood.
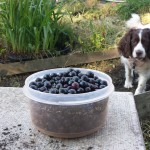
We had a lovely walk in the woods at lunchtime – we took out the neighbours’ year old springer spaniel as well as ten year old Lily, which was a fun change of pace. Sometimes Lily exhausts herself trying to keep up with him but today she was happy for him to run around like a crazy thing while she pottered along. We pottered too – he ran around more than enough for all of us.
After we’d got home from that, I did a quick hours work then headed into the garden to make another scrap wood planter. John’s dad brings us lots of short lengths of scrap timber – the end of planks from a joiners – which aren’t long enough to do much with, but I had an idea the other day for using them to make a planter – and this is the result:

Whenever I’m doing anything with wood, I try to minimise the amount of sawing I have to do because I’m lazy (and have an aversion to sawing after having an awful saw for a long time – the current one is actually really good and easy to use). Conveniently all the flat pieces for the sides and the battens for the bottom were already cut to size – or rather, the sides were all the same size and I let than dictate the height/width of the planter, then found enough suitably sized battens to fit along the bottom. It’s about 1m/3ft long and about 30cm/1ft wide & tall.
Like the other ones I’ve built, it’s made completely from scrap – the short lengths and reusing lengths of structural timber/decking that John’s dad has reclaimed/skip-dived – and I’ll line it with soil bags etc so the only cost are the screws. That was not inconsiderably on this one though – I used a lot of screws! – but at least it’ll double as a really small bomb shelter if we ever have another blitz. ;) If some flat wood – about 1cm by 5cm – turns up, I might use it to make a pretty lip to cover up (and protect) the top rim.
I’m really enjoying making these planters at the moment and hope to get another couple made before I need to start concentrating on planting things in them!
Read MoreMy first soap
I made some soap for the first time last week. It took FOREVER to trace. I wrote a blog post about that but didn’t explain any more about my soap making because, well, frankly, at that point, it looked like it was going to be a big fat fail.

Even though it had reached what could be considered trace, it still felt very sloppy when I was pouring it into the moulds and even overnight and over the next night, it was harder but still very soft. The directions I’d read had said to take it out of the moulds after a couple of days – mine would have still blobbed all over the place at that point. But it clearly was still curing and it was more than ready to leave the moulds today – a week after it was made. (It was probably ready for tipping out by Wednesday – it was a lot paler and seemed like it would hold its shape – but I was just busy with other stuff so thought it would be better to leave it rather than rush it.)
I made two batches – I’ll post the recipes & cost breakdown once I know that it is actually a success and they’re good to use but for now, I’ll say the first was a 100% olive oil soap, and the second was a third olive oil and two-thirds other generic veg oils/shortening — everything bought from supermarkets. As I’ll explain more when I review the two soap-making books I bought, we’re pretty utilitarian when it comes to our soaps – we want them to get us clean, to not be harsh & drying, and to smell alright. We want them to create minimal waste & be as frugal as possible. This is particularly important for me while I’m learning the skills – if I make a mistake, it’s nothing more than a few quid and some time; if I was buying neem oil, shea butter and essential oils, I’d not only be paying more for the ingredients, I’d be paying for postage & packing too and having to wait for them to arrive too.
As expected, the 100% olive oil soap is considerably paler & already harder than the mixed oils one – the veg shortening keeps it that bit softer. Because I ended up making a lot more than I’d intended in one day, I had to get a bit more creative about the moulds than I thought I would at the start. The 100% soap used an old plastic fruit tray & an old deep oven tray as moulds.
The mixed oil one got the choicest mould – a long flat tray with a lid (from when we bought a big pack of ostrich burgers from the farmers market) – but its overflow containers weren’t as suitable really – one of the square olive oil bottles and an ice cream bucket. They were more awkward to use but have resulted in interesting shaped soaps.

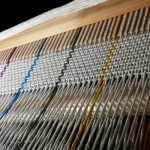
Once I’d popped everything out and cut it to size, I thought “I’ll put this in the airing cupboard to keep curing and drying for the next few weeks”. Then I had a “doh!” moment – the airing cupboard got pulled out by our bathroom refitters on Monday! I hadn’t acted quick enough to keep the racks I’d made which would have been perfect as drying racks (I did though save the cupboard doors – one of which I used as a chopping board for the soap, and the others will make a raised bed). So anyway, I needed something to use for drying racks so yet again, I raided the scrap wood store and twenty minutes later:

A drying rack! It’s a very rough & ready job, done without any measuring hence the slats being a bit wonky, but it’ll do fine for this purpose.

Now the soap is on the new rack drying in the attic room. I guess I shouldn’t declare it a resounding success just yet until it’s finished and we can try it, but after a few days of foreboding failure, it looks a lot more hopeful now!
Read MorePortable chicken run from scrap wood & wire
I was in a bit of a sulk this morning. My weekends – now that the weather is getting better – usually involve playing out in the garden, or at least cooking up treats in the kitchen but this weekend, I’m out all day, both days, at a youth theatre event with the group I help teach. The event should be fun but, you know, not playing in the garden or making sugar-packed goodies. So I was sulking about losing my play time – until I realised there was nothing stopping me playing out this afternoon instead. Even after five years of self-employment, I still feel naughty playing out during a workday – but as soon as I realised I could, I was up and running for the box of screws and our scrap wood supplies.

I find it funny that I get so excited about making things from wood these days because a couple of years ago, I wouldn’t have thought I was capable of doing it. I’m quite a practical girl – I worked as a labourer one summer during uni and I’m happy to get my hands/clothes/face dirty with paint or mud or what-have-you – but I always thought that making things from wood was a Big Serious Skill that wasn’t for my sort. I don’t know why. Perhaps it was because we didn’t really do any big woodwork stuff at school – we did stuff on “resistant materials” (which included bits of woodwork as well as electronics and stuff with plastic/metal) and I remember making little bits of jewellery out of wood and plastic – but it was little things, nothing practical.
I think I started to get converted after we moved into this house just over a year ago – I wanted some airing shelves inside the boiler cupboard so I went over to the DIY shop across the road, bought some 38mm by 19mm lengths, and made them. I think I did a pretty good job – I made them easily removable in case we needed better access to the boiler and they’ve not fallen down yet. Then I decided I wanted a wellie stand for outside and after getting some advice from a friend who is handy with a saw & screws and a scramble around our scrap wood store, we had a shiny new wellie station in a couple of hours. And that’s when the addiction started. I’m not great at it by any means but every time I make something, I learn something new and have tons o’fun :)
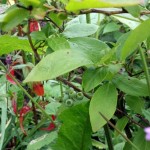
Anyway, this afternoon’s project was a portable chicken run so I could let the chickens out of their main run more. I was inspired by Kate from Living the Frugal Life‘s poultry schooner – it would let me use the chickens to weed and de-slug the veg beds but wouldn’t need me watching over them the whole time (or chasing them around the woods when they got the taste of freedom). I wanted to do a hoophouse thing like Kate’s but didn’t have any material to make the hoops – so I ended up making a boring wood frame instead. At least it was all the boring wood was scrap so free though :)
I made the ends first and was a little surprised by how sturdy they were ;)

The sturdiness was beneficial as the only long lengths I could find were lighter than desirable – but with the sturdy end frames and some supporting struts in the middle, it still felt strong enough. So far, so good.
Read MoreAnother new shelter for the chickens
We made another shelter for the chickens yesterday. My mum calls them “smoking shelters” and I guess the principle is the same – although if I find out our little girls are smoking in there*, there will be hell to pay ;)

My original idea of duplicating the first shelter just using bigger pallets didn’t work out. Cut in half horizontally, the full size pallets wouldn’t be quite tall enough for our girls; cut in half vertically, it would be way too high. Instead we used one of the smaller size pallets and the crate that our greenhouse glass was delivered in for the sides and found some misc wood (an old table top? a gate?) for the roof. It’s not completely water tight at the moment, but I’ll fix that soon. As you can see, it’s already poop worthy.

The existing structure of the crate thing provides extra stability and also the sides of it should help protect the feeder from at least some horizontal rain. I might move the feeder and completely encase the crate bit actually – it might make an al fresco nest box for when they want to lay somewhere different.

I’m not as happy with this one as I was the first one – I have a feeling this is turning into a bit of a Goldilocks thing – the last one was a bit too small for the bigger birds, this one is probably a bit too tall, the next one should be just right though!


(Oh and in some more chicken related news, I think we’ve got our first rats down there – when John went down to check the girls were all in bed last night (they were), he heard a noise and when he turned the light on, the feeder was swaying all by itself. We’ve also found a little hole that could be a tunnel. It’s not a surprise really, given the run/coop is near a waterway and there is always spare food in the feeder. We put a lot of work into fox proofing the run but I guess we need to work on rat proofing it as well now.)
* More bad chicken puns. Top five cigarette brands that chickens would smoke: Clucky Strike, Beakson & Hendges, John Layer Specials, Reggal, Silk Cluck. (sorry.)
Read MoreFrugal, cooking, growing and making link love


It’s super foggy here this morning so I need some ace inspiration to get going – and I thought you might need some too. Here are some of my favourite reads from the last few weeks…
- Ana White makes things that always excite me – demystifying woodwork and creating fab bits of furniture cheaply and easily. I think her old Knock Off Wood blog was the site that most inspired me to pick up a saw and screwdriver – and I just love her most recent side-table – and her “paint it bright” philosophy!
- One thing I was missing when I made my meal from just things I’d grown/caught/foraged was salt – now thanks to ManUpATree, I’m inspired to try making some myself – just got to find some clean enough sea water…
- Gillian of My Tiny Plot neatly summarised Which? Gardening’s heritage versus hybrid veg article – very useful info, thanks Gillian!
- Damn the Broccoli gave us some useful tips on staying warm but keeping the heating bills low…
- Compostwoman of The Compost Bin has been writing about… composting. Specifically, how she does it – and a very seasonal post on how to make leaf mould.
- And finally, Little House in the Suburbs recently ran a seven part series asking their community about lots of aspects of chicken keeping. I’ve contributed a number of times and loved reading what other people had to say – lots of very good advice and suggestions.
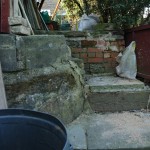
(For anyone who cares, the first is from the top of our garden, looking into the woods next door/at the bottom of the garden – and our chicken coop is in the bottom right; the second is the bandy trees at the bottom of our garden, just behind the chicken run; and the third is over our wood pile to the north, we can’t see our neighbour in that direction in the summer – or when it’s foggy!)
Read More-
 Taking Stock – May 2015
-
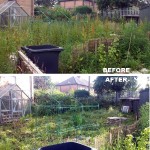
 Making a little more progress at the allotment
-
 Allotment, end of round 1 (ding ding)
-
 Yay, allotment!
-
 Taking stock – June 2014
-
 Do it better
-
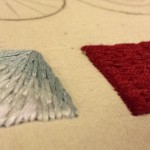
 Stitching etc tips from the Knitting & Stitching Show
-
 No Spend November
-
My winter to-do list 2013
-
 Taking stock: a ‘what I’m up to in my absence’ meme
-
 Plummy solid square crochet blanket
-
 Attack of the Crochet Claw
- Jetpack plugin with Stats module needs to be enabled.
-
 My low-spend '11: buy less than 12 items of clothing in 2011
-
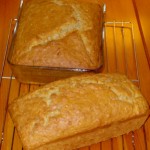 Using up the glut: Marrow cake recipe
-
Cold smoking cheese - taste testing the first batch
-
Spicy marrow chutney recipe
-
 How I line dry clothes in winter: my top five tips
-
 Washing in winter: ideas for reducing laundry?
-
 Foraging for wild food: do you forage near roads?
-
Your favourite fiction books with simple living characters/themes?
-
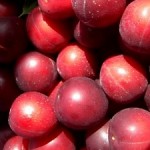 Wild plum/cherry plum jam recipe
-
 How I spent my Tuesday afternoon
-
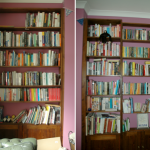 We *heart* books too (warning: picture heavy post!)
-
 Portion control
