

Getting my bac-on – dry curing bacon, stage one
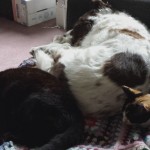
(Title inspired by the fact I sang a meaty “Get your freak on” parody while doing my cure mixing and meat massaging. It was so bad that even the cats, who usually “enjoy” my silly songs and certainly love it whenever I’m doing anything with meat in the kitchen, left the room.)
I finally started my first load of homemade bacon last night. I got my bacon on.

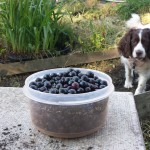
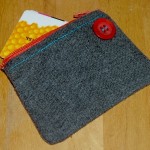
I’ve been meaning to start a load for a couple of months but things kept happening and I didn’t do it. Then on Sunday, we had the best bacon we’ve eaten in a long, long, long time on Sunday (from the excellent Swillington Farm) – I doubt ours will compared but my desire for perfectly preserved pink pork products is strong enough to force me to give it a go. Conveniently our monthly meatbox from Swillington also contained a small slab of belly pork – about 750g/1.5lbs – so streaky here we come :)

(Mmm, soon-to-be streaky!)
I spent a lot of time looking at different cure recipes and was surprised by how many recipes missed out vital bits of information — carefully detailing how much of each thing to use in the cure but then missing out the weight of the meat (300g? 3000g?) — but I think I figured out the required ratios in the end. I’ll hold off posting anything about my cure now until we’ve tasted the finished product – I will say though that I’m reluctant to use saltpetre and haven’t used it this time around. I’m quite glad we’re only using a small piece of pork as I suspect the cure will need some tweaking, for example, there seems to be a lot of coriander seeds on the meat, even though they make up a tiny percentage of the cure mix and I forgot to include pepper, which had been in my original plan. This post is more for me so I can remember what I did for next time :)

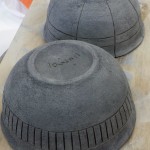
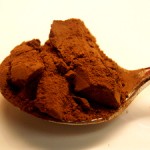
(I did grind the salt up further after I took these pictures.)
What I did: I mixed my cure (NB FutureLouisa: the recipe is in your blue scrap paper notebook), scored the rind the opposite way to the existing scores, then massaged most of the dry cure into the meat. I plopped it into a conveniently correct-sized container, skin down, and within a few hours, liquid had already started leaking out. This evening – and every day for the next five-ish days, I’m going to pour off the liquid and apply more rub (if needed). Then after that, I’ll rinse off any excess cure, pat it dry, then you’re supposed to leave it to hang but I think we’ll probably end up going down the route which sees it wrapped and rested in the fridge. (In the future, I want to try wet-curing & cold-smoking too – but I’ll wait until I’ve finally got around to building another smoker cabinet.)

We’ll just have to see how it turns out!
(Apologies for the bad lighting/mega-shadows in the pictures – we’ve had our normal kitchen lights taken down so the plasterer can reboard and skim the ceiling in there, and have two nasty, very yellow bulbs on wires in their place. Given the disarray, it’s probably not the best time to try an culinary experiment but nevermind!)
Have you made/do you make your own bacon? If so, have you got any tips/advice for my next few days or for my cure next time?
-
 Taking Stock – May 2015
-
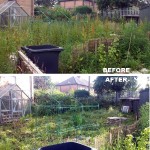
 Making a little more progress at the allotment
-
 Allotment, end of round 1 (ding ding)
-
 Yay, allotment!
-
 Taking stock – June 2014
-
 Do it better
-
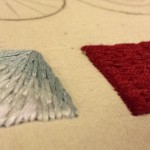
 Stitching etc tips from the Knitting & Stitching Show
-
 No Spend November
-
My winter to-do list 2013
-
 Taking stock: a ‘what I’m up to in my absence’ meme
-
 Plummy solid square crochet blanket
-
 Attack of the Crochet Claw
- Jetpack plugin with Stats module needs to be enabled.
-
 My low-spend '11: buy less than 12 items of clothing in 2011
-
 Using up the glut: Marrow cake recipe
-
Cold smoking cheese - taste testing the first batch
-
Spicy marrow chutney recipe
-
 How I line dry clothes in winter: my top five tips
-
 Washing in winter: ideas for reducing laundry?
-
 Foraging for wild food: do you forage near roads?
-
Your favourite fiction books with simple living characters/themes?
-
 Wild plum/cherry plum jam recipe
-
 How I spent my Tuesday afternoon
-
 We *heart* books too (warning: picture heavy post!)
-
 Portion control

Oohh!! Ohhh!! Can I help? (virtual hand shoots up)
On the recipe front, see if you can track down a copy of the first “Farmhouse Kitchen” book from Yorkshire Television. It contains recipes for all sorts of bacon and ham, as well as cheeses, beer, wine, preserves, sweets, etc. (I’ll try to remember to dig out the details for you tonight, when I get home from work.)
Secondly, I have a recipe book somewhere that talks about air drying/dry curing ham in the fridge. The method is simple: once you’ve completed your salt-cure and got to the point where your recipe tells you to hang the meat, follow the instructions to wrap the meat in a cloth and shape, then clear a space in the fridge and dangle the meat from the underside of a shelf with several inches of clear air around it on all sides (including above and below). Leave for however many weeks the recipe tells you. The meat will gradually dry out and become leathery. The important things are that it is in a breathable cover so that it can dry out and that there is sufficient space around it for air to circulate. (Note: I’m writing this from memory. Not even sure I can find that recipe book, but I’ve read the instructions several times because I want to try and do this at some point.)
Oh, and I just realised I forgot to mention something about the Farmhouse Kitchen book; it does include ratios of meat to cure, etc. It is very, very thorough. Here is the link to the book in Amazon: http://www.amazon.co.uk/Farmhouse-Kitchen-Audrey-Ellis/dp/0091076412/ref=sr_1_31?ie=UTF8&qid=1328088443&sr=8-31
To change the subject slightly, another good thing about this book is its section on bottling, which includes instructions for bottling in a pressure cooker.
Funnily enough, I’ve got the second Farmhouse Kitchen book – a fab, 50p charity shop find – and it didn’t occur to me to look in there or in the John Seymour book which I bet has some info in it too. I did look in my cold smoking books but didn’t want to rely on those in case it was a bit different if you were smoking it afterwards.
I’ll put that book on my list of ones to acquire, thanks for the recommendation :)
Do do let us know asap how it turns out!! We get a pig every year from a friend, but his butcher doesn’t do cured meats so I’d love to have a go myself (except my absolutely FAVE roast is belly, so no streaky for me lol). I ordered the Farmhouse book as soon as I saw that link, thanks PipneyJane :-)
WooHoo! Well done! Can’t wait to hear how it turns out.