

Zero waste pets: the chickens
Back in July, I wrote about our efforts to make our pets zero waste, starting with the dog. Switching between food types recently has made me think about the chickens and waste.
Food
We buy layers pellets in 20kg or 25kg bags. These are usually plastic sacks, which can, for now be reused around the garden for weed barriers, storage etc. I suspect we’ll reach saturation point on that though, so we’ll have to find some other way to reuse or recycle the bags. (Some food, for example, the Golden Yolk stuff I mentioned in the consumption post, comes in thick paper sacks. That is obviously better from a zero waste point of view, although I’d worry about it in the damper months.)

Treats
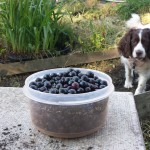
At the moment, now the garden is mostly sleeping, their main treats are corn (20kg plastic sacks, which last for ages and ages) and kitchen scraps.
The latter is interesting from a zero waste point of view – they’re actually helping reduce our waste by eating scraps and leftovers. Admittedly most of the stuff they’re getting would normally go into the compost so it’s not reducing landfill, but it’s making better use of it.
Read MoreWater-saving: how-to fit water-saving aerators to taps
A few weeks ago, I found out that our local water company Yorkshire Water was giving away some water-saving gizmos to its customers. Our water isn’t metered here so we’re not interested in saving water to save money, but more interested in it from a green point of view — and I guess getting into the habit in case we ever do get a water meter fitted.
As well as a shower aerator, a pretty pointless thing for the toilet cistern and a four-minute shower timer (which I’ll use for eggs), we got two tap aerators and a fitting tool.
We fitted one of the tap aerators in the kitchen yesterday and we’re already noticing the difference. It doesn’t feel like we’re getting less water when we’re washing our hands etc but it takes considerably longer to fill a glass/the kettle – showing how much it’s reduced the water flow.
It was really easy to fit the aerator – you don’t need to turn off the water (well, you do at the tap, but not at the stop cock) and we didn’t even need to use the tool provided (I’m guessing it was a wrench type thing to unscrew tight bits).
Let’s start with a shot of water running from the existing tap – for comparison.

Start by unscrewing the very end bit of the tap. You might need the tool or a wrench if it’s tightly attached. Ours screwed off easily with just a bit of a manly grasp (not a euphemism).

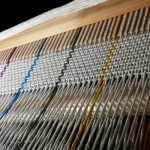
Line drying – Petra’s peg airer
One of my top 5 clothes line drying tips is to use a “peg clothes dryer thing” – it stops the little items taking up space on your main line and is easy to take inside if it starts raining.
Petra left a comment to say she’d made her own from “some electricity pipe, an old iron coat hanger, some rope and pegs”. I asked her to send a picture for inspiration for when I make my own and here it is:

How great is that! Simple but does exactly what it needs to do!
Thanks so much for sending over the picture, Petra!
Read MoreHow to make a piggy bank/money box
Over on Recycle This today, I’ve asked:
As I say in the post over there, my first project needing a moneybox is to retrospectively pay for the automatic chicken pophole door we bought last week. But I’d also like other piggybanks to set aside money for/from other projects – I find seeing money building up physically in a pot has considerably more motivation impact than when it’s building up symbolically in numbers on a bank statement.
So any suggestions on what I can do?
Read MoreMy top 5 clothes line drying tips
 Environmental blogger The Crunchy Chicken is having a line drying challenge for readers of her blog next month – getting people to give up their default use of clothes dryers and make them think about greener alternatives instead.
From both the green and frugal perspectives, I fully support the idea but think it’s a strange time of year to have the challenge – if the purpose is to convert new people to line drying, then now, when it’s getting colder and damper, is not the time to do it. It’s a hard time to line dry. But I guess that is part of Crunchy’s challenge – anyone can line dry in summer, it’s easy to convert people to line drying in summer but if you can show people how line drying is possible all year around, it’ll be more sustainable – not just fair-weather converts.
Here are my top five clothes line drying tips:
1. Find the clothes drying rack/airer that’s right for your home & garden
This feels like a bit of an obvious point but there is a lot of variety. Think about what you’ll use it for most and how you’ll use it rather than buying the first one you see.
Our last house was very short on floor space so we had a ceiling-mounted rack that could be raised or lowered. Here, we’ve got more space but only heat the rooms we’re in so an easily portable airer is better (those vertical concertina style ones fold up and can be carried even when stack with clothes). Radiator ones can be a useful, neat overflow but be careful not to use them for bulky items – it reduces the air flow too much for the middle rows to dry.
Outside, rotary ones give a lot of hanging space and can be folded away easily and quickly. However, they’re awkward to use for bedsheets and other big items – a basic line is better for those (you can get retractable lines too, so they can be folded away easily as well).
And if you live in an area which is frequently showery, you’d be best thinking of an outdoor line you can cover so you can make the most of the warm sunny bits in between the rain — rotary driers can be covered or you can buy ones that are essentially an airer in a tent.
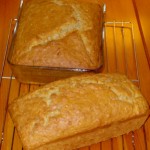
Read MoreBaking things that’ll last
I love baking bread, cakes and biscuits – the process is fun, the product is tasty and it’s very often cheaper than buying them ready-made from a supermarket. But I don’t have the time to bake every day at the moment – and that often results in having to buy expensive, pale imitations of nomminess, and sometimes food waste too.

Our slow rise bread is great – it’s edible as long as there is any to be eaten. Because it’s not quite so fluffy as supermarket bread, it doesn’t feel as instantly stale and it’s fine as fresh bread for three days or so, then good for toast for a couple more days. Other baked goods though – scones, cakes, biscuits – tend to be lovely on the first two days but then quickly stale – either going soggy or hard depending on which is undesirable in the item.
So what do you do to make sure your baked good will last until you can bake again?
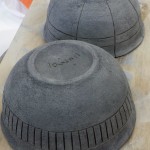
Airtight containers (typically old ice cream tubs) don’t seem to help that much – perhaps with biscuits (cookies) I need something else in there to absorb the moisture… rice perhaps?
Freezing breads & cakes is a possibility – anyone got any preference to freezing them before or after baking (or part-baked)? I keep meaning to freeze homemade pizza dough – it can be frozen at any stage from after kneading or rising, through to full prepared pizza – does anyone have any preferences for freezing at any particular stage?
As for biscuits, I like the idea of making a roll of dough, which is then frozen and sliced & baked on demand (like for these Earl Grey tea thins) – but with all this breads, cakes and pizza dough, I suspect our freezer will quickly fill up! So what are your favourite longer-life biscuit tricks?
Any thoughts, recipes, suggestions etc would be gratefully received!
(Photo by hisks)
Read More-
 Taking Stock – May 2015
-
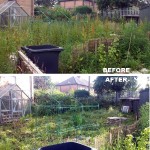
 Making a little more progress at the allotment
-
 Allotment, end of round 1 (ding ding)
-
 Yay, allotment!
-
 Taking stock – June 2014
-
 Do it better
-
 Stitching etc tips from the Knitting & Stitching Show
-
 No Spend November
-
My winter to-do list 2013
-
 Taking stock: a ‘what I’m up to in my absence’ meme
-
 Plummy solid square crochet blanket
-
 Attack of the Crochet Claw
- Jetpack plugin with Stats module needs to be enabled.
-
 My low-spend '11: buy less than 12 items of clothing in 2011
-
Cold smoking cheese - taste testing the first batch
-
 Using up the glut: Marrow cake recipe
-
 How I line dry clothes in winter: my top five tips
-
Spicy marrow chutney recipe
-
 Washing in winter: ideas for reducing laundry?
-
 Foraging for wild food: do you forage near roads?
-
Your favourite fiction books with simple living characters/themes?
-
 How I spent my Tuesday afternoon
-
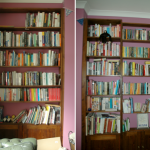 We *heart* books too (warning: picture heavy post!)
-
 Portion control
-
Baking things that'll last
