

Getting my bac-on – dry curing bacon, stage one
(Title inspired by the fact I sang a meaty “Get your freak on” parody while doing my cure mixing and meat massaging. It was so bad that even the cats, who usually “enjoy” my silly songs and certainly love it whenever I’m doing anything with meat in the kitchen, left the room.)
I finally started my first load of homemade bacon last night. I got my bacon on.

I’ve been meaning to start a load for a couple of months but things kept happening and I didn’t do it. Then on Sunday, we had the best bacon we’ve eaten in a long, long, long time on Sunday (from the excellent Swillington Farm) – I doubt ours will compared but my desire for perfectly preserved pink pork products is strong enough to force me to give it a go. Conveniently our monthly meatbox from Swillington also contained a small slab of belly pork – about 750g/1.5lbs – so streaky here we come :)

(Mmm, soon-to-be streaky!)
I spent a lot of time looking at different cure recipes and was surprised by how many recipes missed out vital bits of information — carefully detailing how much of each thing to use in the cure but then missing out the weight of the meat (300g? 3000g?) — but I think I figured out the required ratios in the end. I’ll hold off posting anything about my cure now until we’ve tasted the finished product – I will say though that I’m reluctant to use saltpetre and haven’t used it this time around. I’m quite glad we’re only using a small piece of pork as I suspect the cure will need some tweaking, for example, there seems to be a lot of coriander seeds on the meat, even though they make up a tiny percentage of the cure mix and I forgot to include pepper, which had been in my original plan. This post is more for me so I can remember what I did for next time :)

(I did grind the salt up further after I took these pictures.)
What I did: I mixed my cure (NB FutureLouisa: the recipe is in your blue scrap paper notebook), scored the rind the opposite way to the existing scores, then massaged most of the dry cure into the meat. I plopped it into a conveniently correct-sized container, skin down, and within a few hours, liquid had already started leaking out. This evening – and every day for the next five-ish days, I’m going to pour off the liquid and apply more rub (if needed). Then after that, I’ll rinse off any excess cure, pat it dry, then you’re supposed to leave it to hang but I think we’ll probably end up going down the route which sees it wrapped and rested in the fridge. (In the future, I want to try wet-curing & cold-smoking too – but I’ll wait until I’ve finally got around to building another smoker cabinet.)

We’ll just have to see how it turns out!
(Apologies for the bad lighting/mega-shadows in the pictures – we’ve had our normal kitchen lights taken down so the plasterer can reboard and skim the ceiling in there, and have two nasty, very yellow bulbs on wires in their place. Given the disarray, it’s probably not the best time to try an culinary experiment but nevermind!)
Have you made/do you make your own bacon? If so, have you got any tips/advice for my next few days or for my cure next time?
Read MoreThis year’s wild plum/cherry plum jam
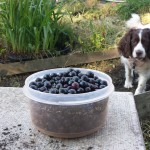
I wasn’t planning to make any jam from the mysterious plum-like fruit that grows outside our kitchen window but when John said he wasn’t sure if he could be bothered making wine, I had to do something with our first harvest. And boy, am I glad I did.

It was about 1kg of mysterious plums (pre-stoning), about 300ml of water, about 750g of sugar and 2tsp of vanilla extract/flavouring.
I’m not sure whether it’s the vanilla or the fact that the plums were super mega ripe when I used them but YUM. I think it’s far nicer than last year (although to be fair, it is a while since I ate last year’s jam so I might be misremembering it/confusing it with something else).
I only made about 3lb because I wanted to make some ketchup with the rest of the plums I had to hand (that’s cooking as I type) but it’s so nice that I want to make more straight-away. Thankfully it looks like we’ll get a few more kilos of fruit yet!
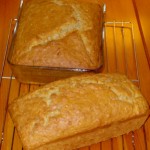
Read MoreLovely Buttery Lemon Curd recipe
I mentioned on Monday that I made a batch of lemon curd while my frustrating, sticky marmalade was boiling away.
Lemon curd is far easier and more fun to make than marmalade, and oh my wow, it’s delicious.

It doesn’t have a long shelf life though – what with the butter and the eggs – but I don’t mind having to make it regularly because it’s so quick and easy that it’s not a problem.
Compared to jams from foraged or grown fruit (where the only expenses are sugar, a tiny bit of spice & energy), this is expensive – lots of bought-in items. Using eggs from our own chickens, it worked out at about 70p a jar; if we’d had to buy in good eggs, it would have been about £1 a jar – not break-the-bank expensive and it is very very nice, but not the cheapest either (the blackberry jam I made last autumn worked out at about 25p a jar since the only thing I had to buy was sugar). It’s a good way to use up egg gluts – something we’ll have to get more proactive with now the girls are laying more.
Buttery Lemon Curd recipe
Ingredients
5 large lemons
5 medium-to-large eggs
250g of butter (!), room temperature
400g of golden caster sugar
2tsp of cornflour
Makes just under 3lbs of lovely lemon curd
Read MoreSix things I learnt while making marmalade yesterday

1. Squeezing multiple oranges and lemons after a couple of days of sewing & gardening is a mistake
I spent a couple of hours yesterday morning cutting back scratchy shrubs (including working underneath a holly bush) and I spent Thursday & Friday evening sewing (aka stabbing myself in the fingers with needles). I also have a tendency to bite the skin around my nails.
OH MY OW.
(Although admittedly after searing pain for a few minutes, it stopped hurting quite so much. They did keep tingling overnight though and even now are more painfully than little cuts or scratches should be.)
2. It’s easier to finely slice rind if it’s rind up, pith down than vice versa
I started with the rind to the chopping board but made much better progress when it was the other way around.
Read MoreSuper easy blackberry jam recipe
 I love cooking but I have a surprisingly low tolerance for faff – particularly faff involving large quantities of sticky substances that need to sit for a long amount of time. I’m also very clumsy, live with an equally clumsy boy, and have less than graceful pets. In other words, preserves that involve the use of jelly bags are not for me.
Most blackberry jam recipes are more like blackberry jelly recipes – they involve straining out the juice and using that to make to the finished pulp-free seedless product. However, if you don’t mind partial berries and seeds, this blackberry jam is super easy and tastes really, really good!
Super easy blackberry jam recipe
1kg of fruit – blackberries and peeled/cored apples (see note #1 below)
1kg of jam sugar (see note #2 below)
1 lemon (see note #3 below)
100ml of water
-
 Taking Stock – May 2015
-
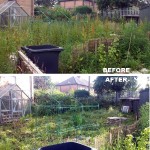
 Making a little more progress at the allotment
-
 Allotment, end of round 1 (ding ding)
-
 Yay, allotment!
-
 Taking stock – June 2014
-
 Do it better
-
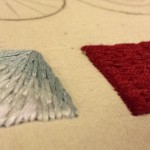
 Stitching etc tips from the Knitting & Stitching Show
-
 No Spend November
-
My winter to-do list 2013
-
 Taking stock: a ‘what I’m up to in my absence’ meme
-
 Plummy solid square crochet blanket
-
 Attack of the Crochet Claw
- Jetpack plugin with Stats module needs to be enabled.
-
 My low-spend '11: buy less than 12 items of clothing in 2011
-
Cold smoking cheese - taste testing the first batch
-
 Using up the glut: Marrow cake recipe
-
 How I line dry clothes in winter: my top five tips
-
Spicy marrow chutney recipe
-
 Washing in winter: ideas for reducing laundry?
-
 Foraging for wild food: do you forage near roads?
-
Your favourite fiction books with simple living characters/themes?
-
 How I spent my Tuesday afternoon
-
 We *heart* books too (warning: picture heavy post!)
-
 Portion control
-
Baking things that'll last
