

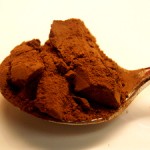
Wild plum/cherry plum jam recipe
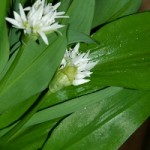
 So last week, we went fishing for fruit on the mystery fruit tree outside our kitchen window. We collected 5.5kg of the plum-ish fruit, probably sacrificed as much the floor gods, and there is still a fair bit up there (albeit not terribly accessible). We’re not sure if they’re wild plum or cherry plum as everyone seems to have different opinions on what constitutes one or the other. Whatever they’re called, they’re very tart but also very sweet.
John wanted to try making plum wine (more on that another time) so I only commandeered 2kg of the harvest for our first batch of plum jam. (I’ll do another smaller jamming once he’s decided how much wine he is making tonight.)
The recipe calls for preserving sugar but granulated sugar would work just as well – preserving sugar is more expensive but the bigger crystals result in a clearer jelly. You don’t need jam sugar (sugar with added pectin) as there should already be enough pectin in the fruit.
UPDATE: Just a quick note to say that in 2011, I added a few drops of vanilla essence to the jam and it added a lovely round flavour. I can’t remember exactly how much or when (I think it was after the sugar so it wouldn’t be cooking too long, but wanted to mention it anyway, because it was delicious :)
Wild plum/Cherry plum jam recipe
Ingredients
2kg of ripe wild plums or cherry plums
1/2 pint of water
1.5kg of preserving sugar (or slightly more if you want it sweeter)
The juice of a lemon/liquid pectin if needed
Jars (we misc old food ones – it probably fills about 6 x standard 450g/16oz jars, but have a seventh on standby just in case)
Waxed paper discs
Method
0. Sterilise your jars so they’re ready to rock: wash them in hot soapy water then rinse them in super hot water, before putting them in a pre-heated oven (to 160C/325F/Gas mark 3) for 15 minutes. Lids should be washed in super hot water.
1. Gently rinse the fruit and crush it slightly to split open the skin (squeezing a few at a time in your hand is enough and feels really pleasant). If they’re *really* ripe, the stone should easily pop out at this stage, if not, just break the flesh and it’ll pop out easily when you’re boiling them.
2. Put the squeezed fruit and the 1/2 pint of water in a big, deep, heavy bottomed pan and heat gently.

Once it’s around the stage in the picture above (after about five minutes or so), you can start fishing out the stones with a slotted spoon if you didn’t do it beforehand.
After about 15-20 minutes until it boils down into a delicious bright red goo.

The goo looks tomato ketchup, very sweet and delicious, and since the fruit you put in was sweet and delicious, it would be a fair guess that this goo is sweet and delicious too. However, be warned, it is not necessarily sweet and delicious at this point. It might be incredibly tart and make you (or your boyfriend/chief tester) pull this face:

3. When the fruit is all gooey, the stones have been removed and your boyfriend has recovered his eyesight, stir in the 1.5kg of preserving sugar. It very quickly changes from letterbox red to a deep shiny maroon.

CAREFULLY taste-test it to see if it’s sweet enough – most sugar recipes have a 1:1 ratio of fruit to sugar but the sweetness of fruit does very a lot and it would have been overwhelming with our fruit. Any less than 1.5kg with our fruit would have been way too sharp but more would have been too sweet – so check for yourself.
Keeping stirring the sugar until it’s all melted then quickly bring to the boil.
4. Let it sit on a hard rolling for a good while – another 15/20 minutes – until it reaches setting point (do a wrinkle test to check).
If it doesn’t seem to be setting and you don’t want to stand there all night, add some commercial-bought pectin (a couple of tablespoons) or the juice of a lemon – although the latter will obviously add to the tartness level so care is needed if it’s already a bit sharp.
5. Once it’s hit the wrinkle point, turn off the heat and leave to stand for a minute so you’re not having to handle molten lava jam.
6. Line up your jars on a chopping board/surface protector. Jam WILL go everywhere so it’s best that it dribbles on something that’s easier to clean that a worksurface. Ladle the still very very hot jam into the still warm from the oven jars.
A jam funnel makes this job considerably easier and less messy. If you’ve not got one, improvise! A cleaned-well top of a round squash/juice/pop bottle is a good substitute.
7. Fill your jars to within 2-3 mm of the top (it’ll shrink back a bit as it cools) then it’s best to use something to stop the jam touching the lid. Purpose-made waxed paper circles are sold but other people use cellophane. The most important thing is that the jar is airtight – if you’ve got the right lid for it, you mightn’t need the waxed paper.

I would like to say for the record that I wasn’t the one who bought the Doritos salsa in the first place. Ick.
8. Once you’ve filled and lidded all your jars, leave them to cool overnight. The next morning, check it’s jellified/jamified to a desirable level – if it’s still a bit runny, tip all the jam back into your (clean) jam making pan and hard boil it some more and consider adding pectin or lemon juice, until you get a clear wrinkle on testing. Clean and re-sterilise your jars before pouring it out again.
Our jam was perfectly jellish and delish! :)
Yield
About 6lbs
Have you made this? What did you think? I’d love to hear your thoughts!
11 Comments
Join the conversation and post a comment.
Trackbacks/Pingbacks
- Marrow and ginger jam recipe | The Really Good Life - [...] writing up the wild plum jam recipe the last week, I realised that I hadn’t written about the marrow…
Leave a Comment
-
 Taking Stock – May 2015
-
 Making a little more progress at the allotment
-
 Allotment, end of round 1 (ding ding)
-
 Yay, allotment!
-
 Taking stock – June 2014
-
 Do it better
-
 Stitching etc tips from the Knitting & Stitching Show
-
 No Spend November
-
My winter to-do list 2013
-
 Taking stock: a ‘what I’m up to in my absence’ meme
-
 Plummy solid square crochet blanket
-
 Attack of the Crochet Claw
- Jetpack plugin with Stats module needs to be enabled.
-
 My low-spend '11: buy less than 12 items of clothing in 2011
-
Cold smoking cheese - taste testing the first batch
-
 Using up the glut: Marrow cake recipe
-
 How I line dry clothes in winter: my top five tips
-
Spicy marrow chutney recipe
-
 Washing in winter: ideas for reducing laundry?
-
 Foraging for wild food: do you forage near roads?
-
Your favourite fiction books with simple living characters/themes?
-
 How I spent my Tuesday afternoon
-
 We *heart* books too (warning: picture heavy post!)
-
 Portion control
-
Baking things that'll last

Having picked wild cherry plums locally I was looking for the perfect jam receipe and here it is!!! Fantastic receipe.. thank you. I have just finished putting my jam into the jars….looks fab and was very easy to follow.
Is your boyfriend/chief tester Tom Hardy? Nice recipe by the way, great on ham sandwiches…
This recipe sounds great, just picked off the tree and cant wait to give it a go. Thanks
Just set the jam in jars, it was DELICIOUS upon taste test. I can’t wait to try it in the morning with bread! Thank you for sharing :)
Nextdoors large plum tree appears to have gone back to the wild , hence cherry plums . This recipe was so simple , used jam sugar with about 2 tablespoons of lemon pectin . It made 6 jars of well set jam . Scolded fingers and a splashed oven , but 6 pots of great jam .
I made some cherry plum jam yesterday following this recipe and I am so pleased with the way it has turned out! This is the first time I have made jam for about 20 years and I found it a really easy to make. The really messy/sticky bit was fishing out all the stones, but it was still good fun! I made 5 full jars and a half of a jar , I Icannot wait to have some on a piece on a piece of toast.
Fantastic to find this recipe. I have a tree in my garden. It took me long enough to actually find out what it was. This means the fruit doesn’t go wasted. The birds enjoy them so I’ll leave a few.
great recipe. I think your boyfriend has a great face
I live in Spain and was really pleased to find a small cherry plum tree on my friends land, we jointly harvested (tree climbing and ladders!!) and so shared the spoils. After picking out the dud ones, we had 1k 400g to use. I had to calculate the lower quantities that I needed and turned my 700g into this fantastic jam. The recipe was so easy to follow, I used granulated sugar and didn’t need pectin/lemon juice. Have just finished bottling, of course I only got 2 &1/2 jars from such a small quantity but on tasting, hubby can’t wait to have it on his toast in the morning!! Thankyou for sharing this recipe
Just making a low carb version with chia seeds and erythritol. Will let you know how it turns out…
I had never made jam in my life (now 70)! We have retired to France and the area in which I live is full of plums and mirabelles. Such an easy recipe. I ended up with very well set jam – 7 jars – I was very pleased…