

Spicy onion soup recipe
One of my fellow drama tutors, Kat, lives off cup-a-soups — she’s 19 and working about five different jobs so she can afford to desert us in a couple of weeks and go to drama school in that London. She’s always rushing from this job to that rehearsal and that’s where the cup-a-soups come in handy. Most of the time I have no reaction to them but the smell of the French onion soup one makes me CRAVE onion soup.

Thankfully onion soup is a fun soup to make — not quick but still easy and frugal. I used to make a (veggie but otherwise) strict version of Delia’s but as with many things I cook, it’s evolved over the years. Perhaps unsurprisingly, my onion soup is now a little spicy. I do like my spice. Feel free to skip the chilli if you don’t like it hot – but the garam masala adds more flavour that heat, so do still use that.
I definitely recommend using a variety of onions if you can – include red onions for sweetness and colour. I used all boring white onions for the version pictured below because I got a big sack of them on a Ramadan special offer last week – I compensated by adding a little more sugar.
It takes a least an hour to make – half an hour for browning the onions then another half hour or so at the soup stage – but the slower the better really. A restaurant in Leeds used to make a 24 hour onion soup – talk about commitment! If I’m cooking other things at the same time, I’ll try for an hour for the browning then another hour at the soup stage but if I’m making it for lunch, it’s closer to an hour. Either way, the house smells GREAT. :)

Spicy onion soup
Makes about four portions
Costs about £1.20-1.50 in total, so between 30-40p a portion
Ingredients
500g onions
25g of butter
Two cloves of garlic, minced
1 chilli, finely chopped, or 2 if you want it properly hot
1-2 tsp of light brown sugar
1tbsp plain flour (optional)
1.5 litres of hot veg stock
1/2 tsp of garam masala
2-3 bay leaves
1tsp of worchestershire sauce
Method
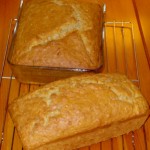
The wonder that is slow rise bread

Slow rise bread is awesome and here’s my top five reasons why.
1. Slow rise bread is really easy and, waiting aside, quick to make.
While it usually takes about 18 hours from start to finish so requires plenty of forethought if you want it for a particular meal, it only takes about 5-10 minutes of actual involvement and for me, most of that time is cleaning my mixing bowl because I’m too disorganised to do that in advance. That’s less time than it takes us to walk to the shop and back.
2. Slow rise bread tastes great.
The bread produced is not like the super fluffy, disturbingly even stuff from supermarkets; it’s heavier, chewier and the bubbles are bigger and more random. This makes it feel considerably more substantial and less like candy floss. You don’t need to eat as much to feel full.
3. Slow rise bread lasts longer than shop-bought bread.
Probably because of the heavier, chewier texture, it doesn’t feel stale anywhere near as fast as supermarket bread. Fresh-baked (rather than pre-packed) supermarket bread always seems to dry out really quickly and by the second day, needs heating in the oven/toasting to be enjoyable. Our slow rise bread is still good to eat on day three or four (although it rarely lasts that long). We waste far less bread/bread products these days.
4. Slow rise bread is cheap to make.
A loaf of the “fancy” stuff from the bread counter in a supermarket usually costs £1-ish — or more if you get their version of an artisan loaf. Even using reasonably fancy flour, my loaves cost about 30p (excluding energy for baking). I suspect I could push this down quite a lot by buying in bulk.
5. Slow rise bread saves money in other ways.
But more than just the cost of the loaf itself, we’ve saved loads of money not going to the supermarket every other day to pick up fresh bread. Because when we were there, we never just brought the bread – we’d pick up other bits and bobs, most of which were treats or other unnecessary purchases.
Easy, tasty & frugal – really, what more could you want from a loaf?
My No Knead, Slow Rise Bread Recipe
Using up the glut: Marrow cake recipe
In my previous post about saving marrow/courgette seeds, I mentioned that the marrow I had was just going from ripe to overripe. I had no particular plans to eat the marrow – we like courgettes a lot but thought, since the variety was billed as a courgette, it would be tasteless as a marrow. I was happy just using it as a seed nursery – but when I’d stripped out the seeds, it seemed a waste to throw it in the compost. If the chickens liked courgettes/marrows, I’d have given it to them but they’re strangely fussy birds so I was left with pounds and pounds of edible flesh.
I test fried a slice and judged it to be alright – not as flavourful as its younger siblings but certainly not bad. Tough skin though – edible but tough, so that had to go. I used half of it to make a cheesy-bacony comfort food bake thing (a variation on this recipe from the Indy but with mixed cheese – parmesan and jarlsberg – because that’s all we had in and also goats cheese makes me gip) – I had some on its own last night and we’ll have the rest tonight with pork chops in a tomatoey sauce. The other half, I used to make a marrow/courgette cake.

Marrow cake/courgette cake recipe
Ingredients
1 large egg (I used 2 medium ones since our girls aren’t laying truly large yet)
200g of caster sugar
100g of melted butter
1/2 tsp of vanilla extract
300g of courgette/marrow, coarse grated
300g of self-raising flour
75g of finely chopped nuts
1tsp of cinnamon
1tsp of baking powder
John’s Grandma’s marrow flower fritters recipe
I remember eating some of John’s Grandma’s marrow flower fritters at the very start of our relationship and so they always remind me of that exciting trying-new-things-with-a-new-person stage. I’d been thinking about making some with the courgette flowers we’ve had popping up over the last few weeks – when John’s mum arrived with a bag full of them last week.
While I encouraged our niece Mia to play ukelele and take photos of strange things, John and his mum whipped up a batch of fritters for lunch. Here’s the recipe – but unfortunately it’s a bit vague as it’s not been written down in their family for decades (if ever!) <- suggestions for revisions gratefully received!

Ingredients (to make roughly 6 palm-size fritters)
Self Raising Flour about 2oz/50g per egg
The aforementioned egg or eggs
About 6 marrow flowers per egg
Some courgette/zucchini (optional but makes it more of a meal)
Pinch of salt
A little black pepper
A little water
Oil for frying
Method
Tear up the marrow flowers into pieces – size is up to you – anything from confetti size to about half the original petal size. If your plants are already fruiting, you can add a thinly sliced courgette (zucchini) to the mix too.
Mix the flour, egg, salt and water together to achieve the consistency of American pancake/drop scone batter – slightly thicker than usual British pancake batter.
Mix the flowers (and courgette, if you’re using that) into the batter.
Heat up some oil in a frying pan for shallow frying. (John & his mum used less oil when they made them and they stuck & burnt a bit.)
Drop a dollop of the batter-with-flowers into the hot oil and fry until golden brown. Flip over to cook the other side and serve immediately. John & his mum ground some more salt onto the top of the cooked fritters but that made them too salty for me – I’d have much preferred more pepper on top instead.
-
 Taking Stock – May 2015
-
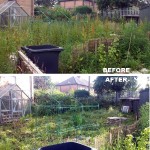
 Making a little more progress at the allotment
-
 Allotment, end of round 1 (ding ding)
-
 Yay, allotment!
-
 Taking stock – June 2014
-
 Do it better
-
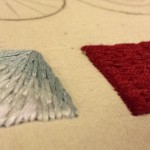
 Stitching etc tips from the Knitting & Stitching Show
-
 No Spend November
-
My winter to-do list 2013
-
 Taking stock: a ‘what I’m up to in my absence’ meme
-
 Plummy solid square crochet blanket
-
 Attack of the Crochet Claw
- Jetpack plugin with Stats module needs to be enabled.
-
 My low-spend '11: buy less than 12 items of clothing in 2011
-
 Using up the glut: Marrow cake recipe
-
Cold smoking cheese - taste testing the first batch
-
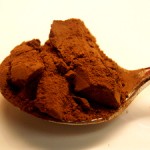
Spicy marrow chutney recipe
-
 How I line dry clothes in winter: my top five tips
-
 Washing in winter: ideas for reducing laundry?
-
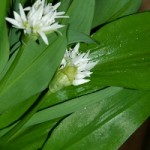 Foraging for wild food: do you forage near roads?
-
Your favourite fiction books with simple living characters/themes?
-
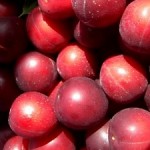 Wild plum/cherry plum jam recipe
-
 How I spent my Tuesday afternoon
-
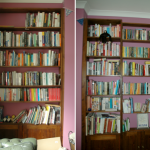 We *heart* books too (warning: picture heavy post!)
-
 Portion control
