

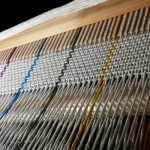
Stitching etc tips from the Knitting & Stitching Show
I’ve been at the Knitting & Stitching Show in Harrogate today.
As I’m not particularly one for just browsing shops (especially at the moment) or just wandering aimlessly, my main focus has been on the workshops. I did four today and have another four lined up for my return visit on Sunday.
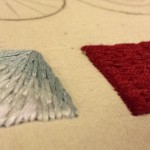
Today I did: the Shibori Blues (indigo/cloth resist dyeing), Intro to Crewel Embroidery, Japanese Embroidery & Embellishing Quilts. They were all interesting but were rushed trying to fit everything into an hour. Embellishing Quilts was the one I was least excited about going into it but I think has been the most valuable (since I want to start quilting); the Japanese Embroidery had the steepest learning curve (having to twist our own threads from the thinnest silk!). Shibori Blues & Crewel Embroidery largely went over things I’ve done before (the former on a general natural dyeing course in February, the latter from a kit I did around the same time) but the latter especially was useful because I had a chance to ask questions about refining my techniques etc.
As well as the subject specific things I learnt in the sessions, I also picked up a lot of general stitching/quilting/misc hints and tips. Some of them may be obvious but they’re new to me. I thought I’d post them here in case they’re new to you too – and to remind me of them, because I’ve not exactly got a lot of processing/practising time these next few days (normal sewing class tomorrow, a comic con on Saturday then back to Harrogate on Sunday – and a novel to finish, as well as everything else that needs doing as usual!).
- If you can’t thread a needle, try approaching the hole from the other side – the eyes are punched out so the hole on one side is usually bigger than the other. (This is not a trick I need as being able to thread needles is one of my superpowers. I am Needle Threading Girl!)
- Don’t lick thread to seal the ends to thread it through the needle’s eye – it apparently swells the fibres
- Use self-threading needles for sewing in the tiny ends – this was an in-passing tip so I didn’t get all the details but I think it would be useful for sewing in the ends of crochet motifs, maybe?
- The waste knot method is the best way to start (crewel) embroidery – though it takes some mental rewiring!
- Start the waste knot method about a centimetre along the stitch line (for line work) so the anchor stitches will be hidden – the waste knot can be anywhere in the same colour space for space work
- Wrap embroidery hoops (both the inner and outer) with bias binding tape or strips of calico to improve the grip – it means you don’t have to over-tighten the hoop and does less damage to the fabric
- Take shower caps from hotels to protect embroidery work – didn’t quite hear the start of this so not sure if it was just while travelling or during reworking…?
- Shower caps are also good for swimming costumes post-pool – rather than wrapping the costume in a towel
- Long and short stitch in crewel embroidery should really be called Long and Longer Stitch – I asked how to make it look good and the simple answer was ‘practise’. The longer answer was:
- Don’t work in just one area at a time when doing long & short stitch – working across the whole area to be filled, sew in the (first round) long stitches to give you an idea of shape/angle before starting on the shorter stitches. Also don’t be afraid to mark the fabric first to plan where they’re going to go.
- Practise was the main repeated advice throughout the three sewing-y workshops – I think of the kits I do as practise/learning new techniques but I think there is a lot of value in doing very small pieces (max 6×4/10cmx15cm) that are nothing more than doodles.
- There is not enough time between Knit & Stitch workshops to either get a cup of tea or eat sandwiches – I thought there was time for tea but there was not and I was late. Plan accordingly!
- Carbon paper is much more effective for image transfer than I thought it would be – I really should try more image transfer stuff
- Everyone tells me Colonial Knots are better than French ones – not sure why yet, will check it out!
- Lakeland do rubber gloves with a cuff at the wrist end – useful for dyers etc – stops the liquid from the hands running up your sleeve
- I saw several examples of quilting/stitching with the design in negative space – just something I hadn’t thought of doing before and something I want to try now.
- Ribbon flowers – do a running stitch along the top of the ribbon (rather than the middle) – they’re easier and more ribbon efficient
- Use a darning foot for machine quilting – can’t remember why, was just told that by someone from a Quilters’ organisation so I believe them ;)
- Use deliberately different shapes/lines for crazy patchworking – just easier!
- Iron-on wadding is good for quilting beginners – one less thing to worry about – it isn’t good for blanket quilts (it’s too stiff) but it’s fine for small decorative pieces/wall hangings
- Iron-on wadding needs to be bubble side up – that’s the glue side
- Make sure all the iron-on wadding is covered before you iron it – the glue will melt and will NOT come off the iron
- Don’t use plastic headed pins for quilting – they melt when you iron over them
- Use a piece of velvet as a mat while doing (seed) beadwork – it makes the beads easier to pick up and stops them rolling about too
Think that’s it – though I’m sure to learn more random stuff on Sunday! (If anyone else will be there on Sunday, I’m doing the Silk & Spindle workshop, then ribbon embroidery, pieced patchwork bowl and Japanese padded fabric pictures, and I might try to fit in a little drop-in batik as well. Basically, I’ll be in Hall E!)
Do you have any favourite stitching tips?
Read MoreCatching up with my crafting
2012 was my year that didn’t happen. A combination of circumstances and mood meant I achieved very little all year. It bummed me out until I just accepted it, and in comparison 2013 has been chipper and wonderfully productive.
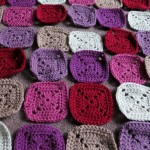
I did a lot of embroidery and other hand-sewing in January and February – an combination of kits (to learn new skillz) and my own designs. This month has been crochet-tastic (I’m working on a big double-bed size blanket – 31 squares down, 23 to go) and I’ve also done some wet felting with resists. All Lily cares about though are the cushions I’ve made for us her.

I started them yesterday then ran out of thread so finished them today. Both days had intended to be garden days as I’ve got a whole bunch of seeds that need to be started ASAP but the eight inches of snow out there is getting in the way somewhat. I remember this week last year, sowing lots of seeds in the mini heatwave then watching them either rot in the soil or succumb to damping off when the weather turned again in April. I’ve not got anything tender on the go in the greenhouse/outside just yet though so this snow will delay things but hopefully won’t kill off much.
In case anyone is interested, the cushion covers are made from an Ikea fabric, Lappljung Randig, which is a lot nicer in person than it is on the web — and it should be because £8/metre isn’t super cheap. It’s a heavy cotton though, and it coordinates well with our grey sofa, and not just because both are covered in dog hair. (Lil is on her blue sofa in the office in the picture.) I bought the fabric back in February, on our usual Valentine’s Day visit to Ikea (it’s so quiet!) but as I nearly cut off the tip of my index finger the following morning, I couldn’t sew them until now. Two related #pro-tips:
Cushion sewing #pro-tip: Remember to open the zip before you finish stitching the final edge, else, annoyingly fiddly.
Cooking #pro-tip: Sharp, fast-spinning stick blender blades are SHARP and FAST-SPINNING.
I’ve got a strip of fabric left over, about 45cm wide and 2 metres long — I think we’ve got enough cushions now (if Lily shares) so I’m trying to think of ideas for it. I might get some fat quarters to coordinate with the colourful stripes and make a little lap quilt. That’ll have to wait its turn on the project list – I’ve got a year of craft ideas to work off first! (Speaking of which, I’ve been on Pinterest for ages for Recycle This but only just started Pinning non-recycling things – I’m louisaparry on there.)
What have you been up to?
Read MoreDo you darn?
These are the socks I’m wearing today:


(Well, the “undersocks” I’m wearing today – I’ve got some big fluffy ones on top – I feel nude if I’m wearing less than two pairs of socks in winter :) )
I’m good at stitching up small holes in socks but when it comes to threadbare patches like these … well, there’s a reason why these threadbare bits are so big!
I’m always more inclined to fix thick socks than this thin sort as I don’t think my needle skillz could manage a very good job on these. But a whole load of my socks have gone this way recently (especially “novelty” ones like these, which I got as Christmas presents when I still got Christmas presents a decade ago) and I’m thinking I need to do something about it — because my sock drawer is rather depleted and I’ve used up all my old worn-out sock reuse/recycling ideas for the time being.
So do you darn? How easy is it to learn how to do it properly/neatly? Would you darn this type of sock or save your time for better quality ones?
Read MoreBook Review: Stitch Step by Step by Maggi Gordon and Ellie Vance
It was a moment of serendipity when I spotted this book, Stitch Step by Step by Maggi Gordon and Ellie Vance, on the “new additions” shelf at the library back in September – I didn’t know it but I was about to get poorly sick — not ill enough to just collapse in a heap but not well enough to, you know, move. I suddenly found myself with a lot of sewing playtime!


The design of the book grabbed me from the outset: the pretty blue/dotty cover; the clear, well laid out tutorial pages; and the stitch galleries, oh my, the stitch galleries.

I think it’s worth noting that I’m quite new to embroidery. I’ve cross-stitched for a few years now but I’ve not spent a lot of time looking into the different stitches available when you break away from the cross (or fractions of it) and backstitches. The stitch galleries in this book really opened my eyes to the different possibilities – I could suddenly see the appeal of making samplers! As this is nearly all counted-thread work, it didn’t seem a million miles from my cross-stitching and it gave me the confident to jump straight into some stitching myself.

I’ll admit, I followed a handful of the tutorials because it was clear to see what to do from the stitch gallery pictures but those that I did follow were clear step-by-step guides as the title of the book suggests :) The pictures were crisp, with good fabric/thread contrast so it was easy to see what was going on. (The one I “chose” to take bad pictures of to illustrate this point is probably the least contrasting one but you can see the layout.)

In addition to the colourful thread work, there were also sections on whitework – which was a new concept to me (the idea of using the stitches to open up holes in the fabric I mean, not just the white-on-white stitching), using beads & sequins and on designing as well as stitching Florentine/Bargello work. Purr. Me like!

As with all tutorial books, they covered the basics as well – how to use embroidery hoops, useful tools, finishing and whatnot – which again, was useful for a newbie like me.
Overall, I didn’t read this book cover-to-cover or feel like I wanted to try every different stitch/tutorial – but it’s not for that: it’s for providing inspiration and reference, and I think it does those things very well.
I did have two minor problems with it though – both design issues. Firstly, I had the hardback version from the library. Apparently there is a paperback version available too — I think the hardback would be better than that but better still would have been a ring-bound hardback, that could have sat open of its own accord on my knee while I was stitching.
The second problem I had was a minor – but very annoying – thing: each page number was decorated with a cute image of a needle and thread. I would see it out of the corner of my eye and try to brush it away. On every. single. page. Sometimes multiple times on each page. ARRRGGGH!! ;)
All in though, I’m very glad I came across it and next time I’m in a sewing mindset (I’m all about crochet at the moment), I think I might have to add it to my bookshelf at home.
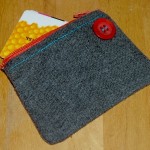
Read MoreThe purse of faffiness
One of my August mini goals was to make myself a new purse. My old purse has been gradually falling to bits and been on my “replace imminently” list for at least a year – the fabric on the other one was see-through it was so threadbare.
I wouldn’t usually blog about such a simple make but I feel like I’ve sweated blood for this one so need to record its completion for posterity ;)

I don’t know why but it just wouldn’t come together. I tried handsewing it at the weekend using a pretty feature of original garment (a pyjama top) but that ended up super wonky so I decided to machine sew another attempt this afternoon – only to find that my replacement for the dog-chewed spool pin had gone missing. I turned the house upside down looking for that (and got somewhat distracted tidying/decluttering) then ordered a replacement for the replacement before realising the machine worked just about ok with the cotton on the bobbin-filling nub. So I cut out my fabric for the second attempt at the purse, only for it to be too small when sown together (I didn’t measure twice, cut once, tut tut tut). Then I couldn’t find the wonky one I made at the weekend (I needed the zip from that for the new one) so turned the house upside down a second time before pilfering one from something else instead. All in all, I’ve put a ridiculous amount of time/effort into making such a simple thing!
But it’s together now and I like it. Plus, it’s almost entirely made from recycled/reclaimed materials – the only new bit is the cotton thread. Now to catch-up on all the stuff I was supposed to be doing while I was faffing around with this…!
Read More-
 Taking Stock – May 2015
-
 Making a little more progress at the allotment
-
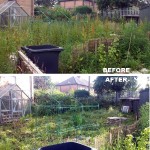 Allotment, end of round 1 (ding ding)
-
 Yay, allotment!
-
 Taking stock – June 2014
-
 Do it better
-
 Stitching etc tips from the Knitting & Stitching Show
-
 No Spend November
-
My winter to-do list 2013
-
 Taking stock: a ‘what I’m up to in my absence’ meme
-
 Plummy solid square crochet blanket
-
 Attack of the Crochet Claw
- Jetpack plugin with Stats module needs to be enabled.
-
 My low-spend '11: buy less than 12 items of clothing in 2011
-
Cold smoking cheese - taste testing the first batch
-
 Using up the glut: Marrow cake recipe
-
 How I line dry clothes in winter: my top five tips
-
Spicy marrow chutney recipe
-
 Washing in winter: ideas for reducing laundry?
-
 Foraging for wild food: do you forage near roads?
-
Your favourite fiction books with simple living characters/themes?
-
 How I spent my Tuesday afternoon
-
 We *heart* books too (warning: picture heavy post!)
-
 Portion control
-
Baking things that'll last
