


The last of the marrows
On Saturday, I harvested the last of the marrows – just under 10kg in total. We’ll get some more courgettes yet – a dozen more or so at least – but they’ve slowed down their production enough that we’ll keep on top of them now so no more massive ones.

I decided to bring them in because a couple of their compadres had started going soggy (the non-soggy bits went to the chickens) and I thought it would be better to use them, not lose them.
We’ve probably had another couple went chickenward earlier in the year, and we’ve picked probably four or five marrows to use ourselves (for cakes, jams or actually as a vegetable) or give to others. It’s crazy to think we’ve possibly had 15-20kg of produce in marrows along – let alone all the courgettes we’ve had over the last few months!
My plans for these guys: chutney, chutney, jam and more chutney; and also more marrow cake to freeze – storing the marrow & summer egg glut together as one tasty cake!
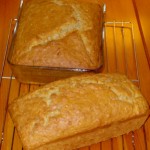
Read MoreBaking things that’ll last
I love baking bread, cakes and biscuits – the process is fun, the product is tasty and it’s very often cheaper than buying them ready-made from a supermarket. But I don’t have the time to bake every day at the moment – and that often results in having to buy expensive, pale imitations of nomminess, and sometimes food waste too.

Our slow rise bread is great – it’s edible as long as there is any to be eaten. Because it’s not quite so fluffy as supermarket bread, it doesn’t feel as instantly stale and it’s fine as fresh bread for three days or so, then good for toast for a couple more days. Other baked goods though – scones, cakes, biscuits – tend to be lovely on the first two days but then quickly stale – either going soggy or hard depending on which is undesirable in the item.
So what do you do to make sure your baked good will last until you can bake again?
Airtight containers (typically old ice cream tubs) don’t seem to help that much – perhaps with biscuits (cookies) I need something else in there to absorb the moisture… rice perhaps?
Freezing breads & cakes is a possibility – anyone got any preference to freezing them before or after baking (or part-baked)? I keep meaning to freeze homemade pizza dough – it can be frozen at any stage from after kneading or rising, through to full prepared pizza – does anyone have any preferences for freezing at any particular stage?
As for biscuits, I like the idea of making a roll of dough, which is then frozen and sliced & baked on demand (like for these Earl Grey tea thins) – but with all this breads, cakes and pizza dough, I suspect our freezer will quickly fill up! So what are your favourite longer-life biscuit tricks?
Any thoughts, recipes, suggestions etc would be gratefully received!
(Photo by hisks)
Read MoreWhat’s in your veg plot over winter…?
A weekend away (on a great cheesemaking short course) means I’m behind on the garden again, sigh…
As well as trying to give encouragement to the bit behind the curve summer veg in the greenhouse, I’m trying to clear space for the winter/spring veg too. I know I should be grateful that most of the courgette/marrow plants are still giving forth their bountiful and succulent fruits, but I’ve got about a hundred brassica seedlings awaiting their moment in the fading autumn sun.

Like my summer growing this year, I’m still experimenting with my winter/early spring selection – to see what grows in this garden – so I’ve got a range of different things to try this year. My leeks are already planted out and doing well. So that’s something. And there are some late-autumn-cropping broccoli on the way. But the rest of the aforementioned brassicas (two types of winter/early spring cabbages, two types of kale and cauliflowers to over winter) are causing me the most concern at the moment. All those seedlings are currently in our sun porch/nursery. I want to get them out into the garden ASAP – they really want to stretch their legs – I’m just not sure where they’re going to go. I think I need to get more mercenary about the dumping the underperforming squashes (another story, another sigh) – and perhaps even cull a still very productive courgette plant, since it’s the only thing left in one of my little curved beds on the middle level. There are also a few containers/planters that could be recommissioned and if I ever get around to building the large/low raised-bed style planters I’ve been planning, that would buy me a lot more growing space, although I had mentally allocated that for garlic…
I can’t forget that the summer harvest from the greenhouse will largely be over and done with in the next few weeks, so I’ll have some space in there for more sheltered growing. I’m not interested in heating the greenhouse really but it’ll be more sheltered and warmer than outside so I suppose some of the tubs of brassicas can have a slightly easier life in there… I’m going to use the (also unheated) sun-porch for winter salad because it’s easier to keep an eye on in there.
…So that’s another half dozen tasks to add to my to-do list. Busy busy busy!
What are you growing this winter? Is there anything you’re starting now/soon to overwinter? What do you grow in an unheated greenhouse overwinter?
Read MoreLILI’s two day Cheese-making course
Last weekend, I went on a cheesemaking course run by the Low Impact Living Initiative. I think it’s the third LILI course I’ve been on and the others have been great introductions to the subject and excellent value for money – so I had high hopes for this one and thankfully, it didn’t disappoint.
When I signed up for the course a couple of months ago, it was listed as being taught by Kathy Biss – author of Practical Cheesemaking and a renowned cheesery teacher – but unfortunately she was ill so Mark Robertson from the Northumberland Cheese Company stepped in instead. Mark admitted at the very start that he’d never taught before and was clearly nervous about doing so – but while the course was presumably very different than it would have been with Kathy, it was possibly more interesting — we learnt less about some more advanced techniques, but more about setting up small scale commercial production (which I find fascinating). Like the keeping chickens LILI course I went on last year, I think knowledge and enthusiasm for the subject goes a long way on these type of intro courses – and Mark had those in spades.
I shalln’t go into any detail about the cheesemaking process that we learnt on the course as there are lots of great tutorials/books available, and I wouldn’t be able to do it justice – this is more a review of the course than a tutorial.
Read MoreCold smoking eggs – first attempt
Last week I mentioned in passing that I had another go at cold smoking using my fantastic cold smoke generator. We very much enjoyed the cheese so I wanted to do more of that – but I also wanted to try a couple of other things too, namely eggs and chillis.

Following the directions in my smoking book (Home Smoking and Curing by Keith Erlandson), a week or so earlier, I put some of our girls’ eggs aside to age (since super fresh eggs are rather difficult to peel) then hardboiled them to perfection even if I do say so myself. Then they went in my make-do smoke house, with the cheese and the chillis, and the CSG loaded up with some lovely smelling hickory.
Because I was distracted during the day (carrying 1.5tonnes of woodchips down to the chicken coop then by a comic-book-bringing visitor), I didn’t turn everything as dutifully as I did the first time. I think I first turned the eggs after about six hours – they were a peachy orange on the top side but surprisingly still white on the side facing the CSG and the remaining four hours. (The CSG runs for 10hrs, not the 12hrs recommended by the book, but I don’t think two extra hours would have made a lot of difference in this instance.)
Read MoreUsing expensive freezer real estate efficiently
 I’m all about space efficiency.
Our last house was so filled to bursting by the time we moved out that we had to be efficient. Shelves everywhere. Storage units/boxes everywhere. Sometimes I think the cats were lucky they weren’t attached to harnesses and hung from the ceiling to save floor space. We nearly cried when we moved here: cupboards can be opened without all their contents spilling out, there are shelves that are empty save for an ornament or two, and each room has space for me to dance the tarantella with the cats (the closest I get to spinning them around) – but there are still a few spots where space is not so cheap & plentiful. The kitchen in general is pretty packed – it’s the smallest room of the house (save for the understairs cupboard) and since we cook, bake & preserve, we use it a lot for a lot of different purposes. However, it’s the fridge and freezer where we feel the squeeze the most – two small under-cupboard appliances – which are always crammed full.
A few weeks ago, some of our favourite ice cream was on buy one get one free but we couldn’t get any because we didn’t have any freezer space. It was then when we realised we weren’t making particularly good use of our precious freezer real estate. One of the drawers – nearly a third of the total space – was filled with a huge lamb joint we’d got super-super cheap, some cheap burger buns bought on BOGOF and a bag of ice which someone brought to our party at New Year, which we’d barely touched. The first two items were themselves bargains but had both sat in there for weeks; the ice was just taking up space — and all three things were costing us money to store and stopping us benefiting from other bargains.
We now have a new usage policy regarding the freezer: we’re not regarding it as a deep freeze for long term storage any more. We’re using it as a way to extend the life of something fresh by a few days – a fortnight at most – but not for storing things for longer than that (with the exception being my small pots of chillis and spring onions – bought in bulk, sliced up and frozen they don’t take up much room but save us buying fresh all the time). Aside from bagels (which freeze well and are a great emergency-lunch bread), we’re not freezing bread and no more buying things – whether bargains or not – especially for the freezer unless we have a specific exit plan for them, ie, we’ll eat them within a fortnight. We’re also not storing any more than a tray of ice except in exceptional circumstances (namely, a big party).
It’s early days in the new policy so I’m not sure how it’ll pan out – we’re brilliant at forgetting about things in there – but it’s worth a shot. I think the most important thing is to be aware that it can be a black hole for food, and the longer food stays in a freezer the more likely it is to end up as food waste, because of freezer burn, it acquiring that cardboard-y taste or changes of taste.
How do you use your freezer efficiently? Do you have any tips for maximising the limited space? Is there anything you just won’t freeze – or anything you obsessively do keep in there?
Read MoreFree photo printing or actually get paid to print your photos
At the end of yesterday’s bargains post, I mentioned filling our new 30 clip frames with free photo prints.
I’m not a fan of printed-at-home photos as even with the best desktop printers, the quality is usually poor and the ink is so expensive too so we look to professional printers whenever we want some pictures printed out.

The other day John discovered that we qualify for 50 free photos a month as part of our Broadband subscription. It sounds like the offer is only for a year but that’s 600 photos in total so not to be sniffed at.
Free is, of course, good but actually getting paid to print your photos is even better: I got paid £3.49 and 50 free prints from Photobox earlier in the summer.
Photobox gives all new customers 50 free 6×4 prints, you just have to pay postage and packing of £1.49. When I signed up though, they were also giving away £5 for every new signup through TopCashBack – so even after p&p costs, I was in profit.
Read More-
 Taking Stock – May 2015
-
 Making a little more progress at the allotment
-
 Allotment, end of round 1 (ding ding)
-
 Yay, allotment!
-
 Taking stock – June 2014
-
 Do it better
-
 Stitching etc tips from the Knitting & Stitching Show
-
 No Spend November
-
My winter to-do list 2013
-
 Taking stock: a ‘what I’m up to in my absence’ meme
-
 Plummy solid square crochet blanket
-
 Attack of the Crochet Claw
- Jetpack plugin with Stats module needs to be enabled.
-
 My low-spend '11: buy less than 12 items of clothing in 2011
-
 Using up the glut: Marrow cake recipe
-
Cold smoking cheese - taste testing the first batch
-
Spicy marrow chutney recipe
-
 How I line dry clothes in winter: my top five tips
-
 Washing in winter: ideas for reducing laundry?
-
 Foraging for wild food: do you forage near roads?
-
Your favourite fiction books with simple living characters/themes?
-
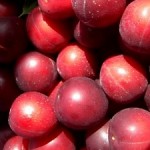 Wild plum/cherry plum jam recipe
-
 How I spent my Tuesday afternoon
-
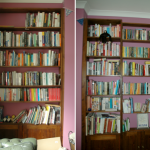 We *heart* books too (warning: picture heavy post!)
-
 Portion control
