

The wonder that is slow rise bread

Slow rise bread is awesome and here’s my top five reasons why.
1. Slow rise bread is really easy and, waiting aside, quick to make.
While it usually takes about 18 hours from start to finish so requires plenty of forethought if you want it for a particular meal, it only takes about 5-10 minutes of actual involvement and for me, most of that time is cleaning my mixing bowl because I’m too disorganised to do that in advance. That’s less time than it takes us to walk to the shop and back.
2. Slow rise bread tastes great.
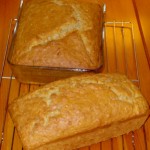
The bread produced is not like the super fluffy, disturbingly even stuff from supermarkets; it’s heavier, chewier and the bubbles are bigger and more random. This makes it feel considerably more substantial and less like candy floss. You don’t need to eat as much to feel full.
3. Slow rise bread lasts longer than shop-bought bread.
Probably because of the heavier, chewier texture, it doesn’t feel stale anywhere near as fast as supermarket bread. Fresh-baked (rather than pre-packed) supermarket bread always seems to dry out really quickly and by the second day, needs heating in the oven/toasting to be enjoyable. Our slow rise bread is still good to eat on day three or four (although it rarely lasts that long). We waste far less bread/bread products these days.
4. Slow rise bread is cheap to make.
A loaf of the “fancy” stuff from the bread counter in a supermarket usually costs £1-ish — or more if you get their version of an artisan loaf. Even using reasonably fancy flour, my loaves cost about 30p (excluding energy for baking). I suspect I could push this down quite a lot by buying in bulk.
5. Slow rise bread saves money in other ways.
But more than just the cost of the loaf itself, we’ve saved loads of money not going to the supermarket every other day to pick up fresh bread. Because when we were there, we never just brought the bread – we’d pick up other bits and bobs, most of which were treats or other unnecessary purchases.
Easy, tasty & frugal – really, what more could you want from a loaf?
My No Knead, Slow Rise Bread Recipe
I use a version of the very widely circulated No Knead Bread recipe but I use slightly less water to make it more manageable.
I also modified it a bit because I’m lazy. I followed the recipe word-for-word a good few times then started slacking off on some bits – I don’t think the quality of the bread changed that much at all.
Ingredients
- 450g of strong white bread flour (or pre-seeded flour)
- about 350ml of water (although I’m careful adding the last 10-20ml)
- 1/2 tsp of instant yeast
- 1 tsp of salt
My method
1. In a large bowl, I mix together the 450g of flour, 1/2 tsp of yeast & 1tsp of salt. Then I add the 350ml of water but I’m careful about adding the last 10-20ml in case I don’t need it all. The original recipe says the dough should be shaggy and sticky but I found this really hard to work with later on, so I leave well mixed but a little firmer. Then I cover the bowl and leave to rest for at least 12 hours. I tend to start them in the early evening and since I’m not an early riser, it’s usually 14-16 hours before I go back to it.
2. After the long rising session, the dough is pleasantly puffy, with visible bubbles. It needs folding over on itself next – the nearest thing to kneading in this recipe. The original NYTimes recipe suggested tipping it out onto a floured board and I do this sometimes but other times I’m lazy – my bowl has a really wide base and I can fold it pretty well in there. After that, the NYTimes recipe calls for it to be put in a proofing bowl/bowl with a cloth in it but when I tried that, admittedly when I was going for a stickier dough to start with, it was a pain in the arse. Leaving it for another 2 hours in my covered mixing bowl had roughly the same effect and was a lot easier – the extra benefit wasn’t worth the extra effort for me. After letting it rest for a while after the folding, I just reshape it a bit then leave it in the bowl again.
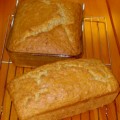
3. About 15 mins before the dough is ready, I preheat the oven to 230C, with my cast iron casserole (with lid) in there to heat up. My casserole is pretty wide, giving us a low wide loaf – I’m looking out for a smaller diameter one so we can make rounder loaves. When both the oven and the pan are hot (the pan has to be super hot or the bread sticks to the bottom rather than sliding out easily), I scoop the dough into the pan and wiggle it a bit so the dough is reasonably evenly distributed around the pan. The lid stays on for the first 20-30 minutes of baking – until the dough has risen nicely into a dome and the beginnings of a crust has formed, then the lid comes off for the next 15-20 minutes, to allow that crust to brown.
John was surprised how easy it is to make identical loaves – in terms of shape and goldenness – using this method.
(As an experiment, I tried cooking it in a bread tin rather than the fills-the-whole-oven casserole. It worked well just the crust was a little chewier.)
Have you made this? What did you think? I’d love to hear your thoughts!
2 Comments
Join the conversation and post a comment.
Trackbacks/Pingbacks
- How can I use my oven more efficiently during baking? | How can I recycle this? - [...] over on my new growing/cooking/making/frugal blog The Really Good Life, I discussed my love affair with slow rise/no knead…
- Save On Energy Bills » Blog Archive » How can I use my oven more efficiently during baking? - [...] over on my new growing/cooking/making/frugal blog The Really Good Life, I discussed my love affair with slow rise/no knead…
- Quick bread: no-rising-time soda bread recipe | The Really Good Life - [...] The other week, I asked about how people manage with baking when the weather is cooler – when it’s…
Leave a Comment
-
 Taking Stock – May 2015
-
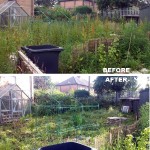
 Making a little more progress at the allotment
-
 Allotment, end of round 1 (ding ding)
-
 Yay, allotment!
-
 Taking stock – June 2014
-
 Do it better
-
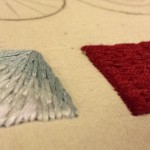
 Stitching etc tips from the Knitting & Stitching Show
-
 No Spend November
-
My winter to-do list 2013
-
 Taking stock: a ‘what I’m up to in my absence’ meme
-
 Plummy solid square crochet blanket
-
 Attack of the Crochet Claw
- Jetpack plugin with Stats module needs to be enabled.
-
 My low-spend '11: buy less than 12 items of clothing in 2011
-
 Using up the glut: Marrow cake recipe
-
Cold smoking cheese - taste testing the first batch
-
Spicy marrow chutney recipe
-
 How I line dry clothes in winter: my top five tips
-
 Washing in winter: ideas for reducing laundry?
-
 Foraging for wild food: do you forage near roads?
-
Your favourite fiction books with simple living characters/themes?
-
 Wild plum/cherry plum jam recipe
-
 How I spent my Tuesday afternoon
-
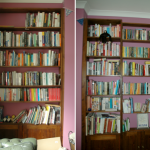 We *heart* books too (warning: picture heavy post!)
-
 Portion control

This was brilliant. I did mine in an old dutch oven. Everyone thought it was from a new bakery just opened because we can’t find bread this good. Thank you for the recipe.
I am sick today with a cold and perhaps that is why my brain isn’t working but it seems you might be somewhere other than the United States. I can’t read the recipe. Can you tell it to me using “cup” measurements. I also don’t think I read the oven setting correctly. Can you give me a setting in “F”? Thank you!