

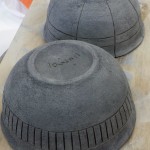
My kindling cutting “helpers”
I had some company while cutting the kindling this morning.
Lily was taste-testing each stick as it came off the axe.

“Mmm, bit of a woody flavour.”
And a few minutes later, after Lily had gone into a sulk because she’d heard the fake camera click of my phone (she HATES all cameras for some reason), Lime the chicken came to see what was going on too — the first time she, or any of the chickens, have visited the top level of the garden, which is three flights of stairs away from the chicken coop/run.

She watched me chopping some kindling for a bit but she was more interested in John cutting wood in the woodstore though and spent ages stood behind him, head cocked to one side and making the occasional clucking noise, as he sawed up some logs. She seemed to have no interest in any of the many edibles on that level, just wondering what us crazy humans were up to. :)
(Appalling camera phone pics, sorry for the quality.)
Read MoreThe purse of faffiness
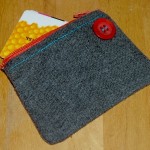
One of my August mini goals was to make myself a new purse. My old purse has been gradually falling to bits and been on my “replace imminently” list for at least a year – the fabric on the other one was see-through it was so threadbare.
I wouldn’t usually blog about such a simple make but I feel like I’ve sweated blood for this one so need to record its completion for posterity ;)

I don’t know why but it just wouldn’t come together. I tried handsewing it at the weekend using a pretty feature of original garment (a pyjama top) but that ended up super wonky so I decided to machine sew another attempt this afternoon – only to find that my replacement for the dog-chewed spool pin had gone missing. I turned the house upside down looking for that (and got somewhat distracted tidying/decluttering) then ordered a replacement for the replacement before realising the machine worked just about ok with the cotton on the bobbin-filling nub. So I cut out my fabric for the second attempt at the purse, only for it to be too small when sown together (I didn’t measure twice, cut once, tut tut tut). Then I couldn’t find the wonky one I made at the weekend (I needed the zip from that for the new one) so turned the house upside down a second time before pilfering one from something else instead. All in all, I’ve put a ridiculous amount of time/effort into making such a simple thing!
But it’s together now and I like it. Plus, it’s almost entirely made from recycled/reclaimed materials – the only new bit is the cotton thread. Now to catch-up on all the stuff I was supposed to be doing while I was faffing around with this…!
Read MoreTen things
- Buff the chicken has been in isolation since last Wednesday since the others started really *viciously* bullying her (as I said on Twitter, it’s disturbing how vicious chickens can be). I think there have been pecking order issues over the last few weeks and it’s stopped her being able to eat properly. She feels very bony (even for a pure breed) and is weak as a result – looking back at old photos of her, the difference is stark. I’m hoping some time by herself and some special food will turn her around but I wouldn’t be surprised to go down one morning to find she’d died overnight. Sigh.
- We painted the bathroom on Sunday – not the woodwork yet but the second coat of the walls, ahead of the cupboards being fitted tomorrow. One June mini goal down (nearly)!
- In other housey news, last year we found a hidden coal hole at the front of our house and over the last couple of weeks, we’ve been having it damp-proofed and turned into a utility room. It’s not been cheap but now has a proper full height doorway and is a proper extra room for the house – it’ll free up room in the kitchen too. It should be finished this week, hurrah!
- While that’s going on at great expense inside, John’s DIY-mad dad is fitting a fence for us outside — to help contain the dog and the chickens a bit more. The fence is going to be rather frugal for a new fence as the lumberyard John’s dad goes to was throwing away about 20 horizontal fencing beams and some posts, because they’d got slightly bleached in the sun so couldn’t be sold “as new” any more. Madness! But useful timing for us!
- And speaking of freebies, someone was taking a seemingly brand new electric staple gun in its case at the tip last time John’s dad was visiting – they told him it was “broken” but he took it home and found they’d just inserted the staplers in the wrong place. We now have a brand new working electric staple gun for free ;)
- I never used to use bar soap to wash anywhere other than my hands – it left a film and dried my skin, causing my face in particular to get greasier in compensation. But my olive oil soap leaves my skin clean and soft – and it stays feeling that way for 12+ hours unlike just about every other cleaning method I’ve tried. I very much like it.
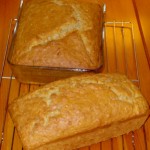
- I made the ugliest soda bread I’ve ever made today – I don’t know what went wrong but it grew really unevenly. Still tasted lovely with soup for lunch though :)
- Some of my rapini has gone to seed – the heads weren’t big enough to warrant harvesting. Damn the hot spring!
- Do you make your own quiches? I’m looking for (frugal) store-cupboard recipe quiche ingredient ideas for when we’ve not got much else in — Viksterbean on Twitter suggested antipasti such as olives and artichokes, and that made me think about adding a swirl of pesto too. Any other ideas?
- Boron would like it to be known that I did not write this post alone. Apologies for the poor quality of my webcam – I only ever use it for these type of pics ;)

Adventures in frugal vertical gardening: salvaged planters
A few weeks ago, our next door neighbour with the gorgeous show house revamped his garden for summer. His deck is decorated like a room of the house (including an old vintage dresser, which looks fab with bedding plants draped out of the drawers and is currently topped with a birdcage and some matching framed photos) and he prefers to have just a few pots around the seating area rather than our overgrown scruffy (albeit veg-tastic) garden. As much as I like growing our own food, I do look at his garden wistfully sometimes – so lovely, so little upkeep! ;)
Anyway, so the guy with the great taste was tidying up his garden and at some point in his tidying mission, he decided he no longer wanted four wooden trough planters – he’d had them for a couple of years and they were looking past their best, so he dumped them on the (communal) bonfire heap at the bottom of our garden. I spotted the next time I was passing on the way into the woods with Lily-dog and mentally bagsied them – sure, they were a little past their prime but i) aren’t we all? and ii) they’re nothing a bit of TLC couldn’t fix.
I didn’t actually collect them until yesterday – but on closer inspection confirmed what I’d thought — a couple of bangs with a hammer (to reinsert some nails), a couple of supporting screws and a lick of paint and they’d be fine.


They’d got a bit damp in the recent rain so I let them dry in the sun for a while then wielding my hammer & screwdriver, did my minor fixes. The smaller trough was still in good condition so I just gave the wood a bit of a polish to freshen it up a bit. It’s not perfect but it’ll do as a small herb pot.

The three bigger ones, I cleaned up then slapped on a couple of coats of white acrylic primer. I didn’t want to paint all the way inside, just to roughly where I imagine the soil level will be.

I’d wanted some nice troughs for the balcony for a while – for salad and herbs right next to the kitchen door – and to maximise space, I decided to build another tiered planter stand thing. (The first one of those is proving very useful by the way – it’s currently filled with pots of different salad leaves.) I wanted it to be as simple as possible but the sides of the troughs were too angled to attach uprights to them – I could have attached them directly to the wall with brackets but prefer the flexibility of freestanding stuff where possible, so ended up building another shelved planter stand.

I did start with wider shelves, with room for extra pots on either side, but decided to make it narrower and neater so it would fit better on the balcony and be stronger. I have also added supports onto the bottom of each trough so they can be screwed onto the shelves to make them more stable/less likely to tip over – I just haven’t done that yet because I want to paint everything first. The narrower stand itself is stable but the individual troughs will be a bit top heavy.

The uprights are made from salvaged decking and the shelves from salvaged (due to being warped in parts) battens (both courtesy of John’s dad) – so structurally, it was completely free. I’m not sure where the primer came from (I suspect John’s dad brought that around too, it just appeared in our house) and it will need painting again — I have some leftover gloss paint in fun colours but I think I need exterior paint or an acrylic based paint for outside stuff (don’t I?) so I, gasp, might have to buy a little pot for that bit, unless I can scrounge some off someone else this weekend. Any colour suggestions by the way? (For context, the metalwork of the balcony it’ll stand on is painted black, the walls at that level are exposed Yorkshire stone and the window sills will be black when we get around to painting them.)
Still though, even if I have to buy a little paint, I’ll still be happy with the final cost and the finished item – it’ll more than pay for itself if it grows the herbs and salad I have planned. :)
Read MoreUsing our 100% vegetable oil soap
You may remember a few months ago I spent a bajillion hours waiting for some 100% olive oil soap to reach trace then, as a glutton for punishment, I decided to make a second batch of another 100% vegetable oil soap the same day.
We started using the 100% olive oil soap and have got through a few small bars of it – John likes it a lot. He likes that it doesn’t lather much (as it, conversely, encourages him to use less of it) and it doesn’t smell perfumed either (he hates perfumed things).
In a “why change what’s working?” way, we hadn’t tried the other set of soap – the 100% veg oils one – but I decided that should change this week!

The non-lye ingredients of the 100% olive oil one are pretty obvious – the 100% veg oil one a little more complicated — but still, everything bought from the supermarket. I used Frugal Queen’s recipe and method – olive oil, sunflower oil and Cookeen (solid veg shortening) – just leaving out the scent. It traced faster than the olive oil one thankfully!
The resulting soap is softer than the 100% olive oil one (apparently that’s down to the veg shortening) and not quite as pale – a soft lemon-ish colour. (It had some soap ash on it when I first picked it out of its drying place, which I’ve mostly scrapped off – hence the not-perfectly-smooth edges and slight colour variation on the before use picture above). It lathers quite a bit more than the olive oil soap – not crazy commercial soap levels but noticeably more. It did feel more like shop bought soap though – leaving my skin feeling a little “squeaky”. That’s not necessarily a bad thing, just a thing.

I spent £5.27 on the ingredients (£1.89 on the olive oil [on offer at Netto at the time], £1.06 on the sunflower oil, £1.43 on the shortener and £0.89 for the caustic soda needed for this recipe – based on a 500g bottle from Wilkinsons; and I used tap water and no scent) – which I think out frugals the Frugal Queen ;) I ended up with 2850g of finished soap – the bars were randomly sized but if they were normal 100g-ish bars, that would be about 19p a bar (or about 24p a bar if they’re 125g, which was the weight I used to work out the per-bar cost of the 100% olive oil ones [35p]).
As I said regarding the 100% olive oil ones, I’m not sure I enjoyed the process enough to do it often but I like the idea of making a big batch every six months/year as necessary. Before the next batch though, I’m going to try handmilling some of the ones from this batch to try out different (frugal, supermarket-sourced) scents – and might try turning a bar into liquid soap too as that’s handy when my hands are filthy from gardening.
Has anyone else made the Frugal Queen’s 100% veg oil soap? What did you think of it? Or do you have any 100% supermarket-sourced veg oil soaps? Or suggestions for frugal scents and any handmilling/liquid-soap-from-bar making advice?
Read MoreFrom pelmet to planter
Yesterday, we went to see John’s mum & dad, and spotted that one of their neighbours had put a fancy (curtain) pelmet out on the street in front of their house to be taken away – either by John’s dad (who they know is a salvager of random things or by a scrap person). I thought it looked pretty sturdy so bagsied it instead.


A surplus plank of wood and four screws later, and I had a pretty new herb trough :)

The original plan had been to wall mount it (I had some old brackets that would work & look nice, and it would save having to add a back piece to it) but it turned out that because of a supporting fence post, it didn’t fit where I’d hoped to put it. It does though fit perfectly on the little ledge behind the greenhouse.

I’ve drilled some drainage holes in the bottom and will add more rocks-as-crocks to stop it getting waterlogged (if it ever rains). As I’ve mentioned before about that ledge, it’s not *that* accessible in the summer so I can’t use it for things I need to pick regularly – but it will be good for companion plants & not-picked-often herbs. It’s not massive — 5ft long, about 8inch deep and about 6inch wide — but it’ll make a bit of use of some otherwise dead space. Plus, I think it looks pretty cool :)
And weee, another freebie :)
Read More-
 Taking Stock – May 2015
-
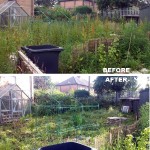
 Making a little more progress at the allotment
-
 Allotment, end of round 1 (ding ding)
-
 Yay, allotment!
-
 Taking stock – June 2014
-
 Do it better
-
 Stitching etc tips from the Knitting & Stitching Show
-
 No Spend November
-
My winter to-do list 2013
-
 Taking stock: a ‘what I’m up to in my absence’ meme
-
 Plummy solid square crochet blanket
-
 Attack of the Crochet Claw
- Jetpack plugin with Stats module needs to be enabled.
-
 My low-spend '11: buy less than 12 items of clothing in 2011
-
Cold smoking cheese - taste testing the first batch
-
 Using up the glut: Marrow cake recipe
-
 How I line dry clothes in winter: my top five tips
-
Spicy marrow chutney recipe
-
 Washing in winter: ideas for reducing laundry?
-
 Foraging for wild food: do you forage near roads?
-
Your favourite fiction books with simple living characters/themes?
-
 How I spent my Tuesday afternoon
-
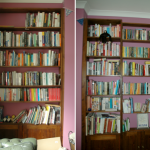 We *heart* books too (warning: picture heavy post!)
-
 Portion control
-
Baking things that'll last
