

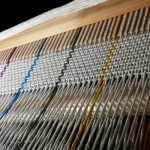
Stitching etc tips from the Knitting & Stitching Show
I’ve been at the Knitting & Stitching Show in Harrogate today.
As I’m not particularly one for just browsing shops (especially at the moment) or just wandering aimlessly, my main focus has been on the workshops. I did four today and have another four lined up for my return visit on Sunday.
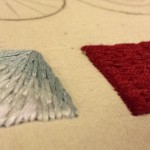
Today I did: the Shibori Blues (indigo/cloth resist dyeing), Intro to Crewel Embroidery, Japanese Embroidery & Embellishing Quilts. They were all interesting but were rushed trying to fit everything into an hour. Embellishing Quilts was the one I was least excited about going into it but I think has been the most valuable (since I want to start quilting); the Japanese Embroidery had the steepest learning curve (having to twist our own threads from the thinnest silk!). Shibori Blues & Crewel Embroidery largely went over things I’ve done before (the former on a general natural dyeing course in February, the latter from a kit I did around the same time) but the latter especially was useful because I had a chance to ask questions about refining my techniques etc.
As well as the subject specific things I learnt in the sessions, I also picked up a lot of general stitching/quilting/misc hints and tips. Some of them may be obvious but they’re new to me. I thought I’d post them here in case they’re new to you too – and to remind me of them, because I’ve not exactly got a lot of processing/practising time these next few days (normal sewing class tomorrow, a comic con on Saturday then back to Harrogate on Sunday – and a novel to finish, as well as everything else that needs doing as usual!).
- If you can’t thread a needle, try approaching the hole from the other side – the eyes are punched out so the hole on one side is usually bigger than the other. (This is not a trick I need as being able to thread needles is one of my superpowers. I am Needle Threading Girl!)
- Don’t lick thread to seal the ends to thread it through the needle’s eye – it apparently swells the fibres
- Use self-threading needles for sewing in the tiny ends – this was an in-passing tip so I didn’t get all the details but I think it would be useful for sewing in the ends of crochet motifs, maybe?
- The waste knot method is the best way to start (crewel) embroidery – though it takes some mental rewiring!
- Start the waste knot method about a centimetre along the stitch line (for line work) so the anchor stitches will be hidden – the waste knot can be anywhere in the same colour space for space work
- Wrap embroidery hoops (both the inner and outer) with bias binding tape or strips of calico to improve the grip – it means you don’t have to over-tighten the hoop and does less damage to the fabric
- Take shower caps from hotels to protect embroidery work – didn’t quite hear the start of this so not sure if it was just while travelling or during reworking…?
- Shower caps are also good for swimming costumes post-pool – rather than wrapping the costume in a towel
- Long and short stitch in crewel embroidery should really be called Long and Longer Stitch – I asked how to make it look good and the simple answer was ‘practise’. The longer answer was:
- Don’t work in just one area at a time when doing long & short stitch – working across the whole area to be filled, sew in the (first round) long stitches to give you an idea of shape/angle before starting on the shorter stitches. Also don’t be afraid to mark the fabric first to plan where they’re going to go.
- Practise was the main repeated advice throughout the three sewing-y workshops – I think of the kits I do as practise/learning new techniques but I think there is a lot of value in doing very small pieces (max 6×4/10cmx15cm) that are nothing more than doodles.
- There is not enough time between Knit & Stitch workshops to either get a cup of tea or eat sandwiches – I thought there was time for tea but there was not and I was late. Plan accordingly!
- Carbon paper is much more effective for image transfer than I thought it would be – I really should try more image transfer stuff
- Everyone tells me Colonial Knots are better than French ones – not sure why yet, will check it out!
- Lakeland do rubber gloves with a cuff at the wrist end – useful for dyers etc – stops the liquid from the hands running up your sleeve
- I saw several examples of quilting/stitching with the design in negative space – just something I hadn’t thought of doing before and something I want to try now.
- Ribbon flowers – do a running stitch along the top of the ribbon (rather than the middle) – they’re easier and more ribbon efficient
- Use a darning foot for machine quilting – can’t remember why, was just told that by someone from a Quilters’ organisation so I believe them ;)
- Use deliberately different shapes/lines for crazy patchworking – just easier!
- Iron-on wadding is good for quilting beginners – one less thing to worry about – it isn’t good for blanket quilts (it’s too stiff) but it’s fine for small decorative pieces/wall hangings
- Iron-on wadding needs to be bubble side up – that’s the glue side
- Make sure all the iron-on wadding is covered before you iron it – the glue will melt and will NOT come off the iron
- Don’t use plastic headed pins for quilting – they melt when you iron over them
- Use a piece of velvet as a mat while doing (seed) beadwork – it makes the beads easier to pick up and stops them rolling about too
Think that’s it – though I’m sure to learn more random stuff on Sunday! (If anyone else will be there on Sunday, I’m doing the Silk & Spindle workshop, then ribbon embroidery, pieced patchwork bowl and Japanese padded fabric pictures, and I might try to fit in a little drop-in batik as well. Basically, I’ll be in Hall E!)
Do you have any favourite stitching tips?
Read MoreAttack of the Crochet Claw
One of the reasons my crafting extravaganza hasn’t gone as planned is because of my hands. Between lots of wet felting, crochet and protecting my super-sensitive new scar over the last month, they’ve been slowly turning into T-Rex claws. But it wasn’t until Friday, when my knuckles were properly swollen and achy as well as stiff, that I actually thought about it seriously.

(Me, on Friday. Except I have curlier hair. And glasses. And a shorter tail.)
When I’m working at my computer, I’m pretty good at taking breaks, sitting in a good chair and doing little exercises to help reduce shoulder/eye strain etc. (I don’t use it any more but when I worked at the university, I used to use Workrave to keep me in line.) But for some reason, I don’t apply the same principle to crafting – I can sit curled up in a ball, on the sofa, for hours at a time, and the only exercise I do to break it up is occasionally tickle an animal or clasp my claw around a cup of tea. (This is a small exaggeration, but only a small one.)
As my dad has pretty bad osteoarthritis and I’ve had joint pain problems in the past (in my knees particularly), I’ve decided to take Claw Friday as a bit of a wake up call so it doesn’t get worse in the future. I’ve started breaking up my crafting like I do my computer time (and like any sensible, normal person would do) and switching between different things (eg between crochet and sewing over the weekend) rather than doing the same thing over and over again. I’m hoping to start going swimming again regularly from the summer onwards which will help things generally but in the meantime, I’ve also started doing some hand/forearm exercises that I remember from my yoga/pilates days – hopefully encouraging my muscles to become a little more flexible again. It’s amazing how just a few days of those has already improved things.
Do you do any particular exercises to help prevent RSI/other injuries during your crafting/making or gardening etc? Do you have any tips?
Read MoreBook Review: Stitch Step by Step by Maggi Gordon and Ellie Vance
It was a moment of serendipity when I spotted this book, Stitch Step by Step by Maggi Gordon and Ellie Vance, on the “new additions” shelf at the library back in September – I didn’t know it but I was about to get poorly sick — not ill enough to just collapse in a heap but not well enough to, you know, move. I suddenly found myself with a lot of sewing playtime!


The design of the book grabbed me from the outset: the pretty blue/dotty cover; the clear, well laid out tutorial pages; and the stitch galleries, oh my, the stitch galleries.

I think it’s worth noting that I’m quite new to embroidery. I’ve cross-stitched for a few years now but I’ve not spent a lot of time looking into the different stitches available when you break away from the cross (or fractions of it) and backstitches. The stitch galleries in this book really opened my eyes to the different possibilities – I could suddenly see the appeal of making samplers! As this is nearly all counted-thread work, it didn’t seem a million miles from my cross-stitching and it gave me the confident to jump straight into some stitching myself.

I’ll admit, I followed a handful of the tutorials because it was clear to see what to do from the stitch gallery pictures but those that I did follow were clear step-by-step guides as the title of the book suggests :) The pictures were crisp, with good fabric/thread contrast so it was easy to see what was going on. (The one I “chose” to take bad pictures of to illustrate this point is probably the least contrasting one but you can see the layout.)

In addition to the colourful thread work, there were also sections on whitework – which was a new concept to me (the idea of using the stitches to open up holes in the fabric I mean, not just the white-on-white stitching), using beads & sequins and on designing as well as stitching Florentine/Bargello work. Purr. Me like!

As with all tutorial books, they covered the basics as well – how to use embroidery hoops, useful tools, finishing and whatnot – which again, was useful for a newbie like me.
Overall, I didn’t read this book cover-to-cover or feel like I wanted to try every different stitch/tutorial – but it’s not for that: it’s for providing inspiration and reference, and I think it does those things very well.
I did have two minor problems with it though – both design issues. Firstly, I had the hardback version from the library. Apparently there is a paperback version available too — I think the hardback would be better than that but better still would have been a ring-bound hardback, that could have sat open of its own accord on my knee while I was stitching.
The second problem I had was a minor – but very annoying – thing: each page number was decorated with a cute image of a needle and thread. I would see it out of the corner of my eye and try to brush it away. On every. single. page. Sometimes multiple times on each page. ARRRGGGH!! ;)
All in though, I’m very glad I came across it and next time I’m in a sewing mindset (I’m all about crochet at the moment), I think I might have to add it to my bookshelf at home.
Read MoreThings I’m get unduly excited about at the moment
The lovely people who have been reading this blog for a while may be aware that I get unduly excited about strange things. Like freshly cleared out chicken coops. And stupid puns. And graphs. And really obscure references in post tags for others in the small set of people who like both cartoons & mycology.
ANYWAY. It’s Friday afternoon (singalong Friday afternoon in our office) so I thought I’d think about some of things that made me all happy-happy-joy-joy. This is what I’ve been getting unduly excited about recently:
 1. The pointy bit on, say, tomato puree tube lids that you turn upside down and use to pierce the foil on the top of the tube bit. (I wonder if they have an actual name because that’s kinda long winded.)
I used one the other day and was reminded of the genius – it does the job perfect and safely. I don’t have to hunt around for a knife or similar – and risks stabbing myself when said knife inevitably slips. It probably doesn’t add much, if anything, to the production time or costs (since the lids are just formed plastic anyway), and doesn’t impact the level of waste or whatever. Plus, if it’s a shaped spike, it makes the tomato puree come out in the fancy pattern, like a considerably less gross version of these. (Warning: link contains poo humour and a waste-of-plastic “gag gift”.)
2. How much quicker it is to defrost stuff in a bowl of water than just on the side
A 1lb/500g pack of diced lamb fully defrosted in about an hour the other day, versus probably all day if I’d not put it in water. Woo. And then I turned that lamb into a lovely casserole thing with lots of veggies and chickpeas. Double woo.
3. The thread slicer on a sewing machine.
I like to jump right in when it comes to crafts and rarely plan ahead enough to remember to grab a pair of scissors. And even if I do, it’s time consuming to pick them up whenever I need to make a quick snip. So the little (shielded) sharp bit of metal on the side of the machine is wonderful for me.
 4. Seam/stitch rippers
And similarly, seam or stitch rippers, whatever you want to call them. So small yet so useful!
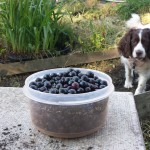
5. The fact that we might get to see the sea tomorrow
Great on two counts: 1) the sea, weeeee! and 2) dog in sea = hilarious.
6. That when I came to search for a picture of a tomato puree tube for the picture up top, by completely coincide I ended up on Recycle This and a photo I took two and half years ago.
I thought, “oh, I’ll use that, we use Morrisons tomato puree after all – oh! that’s our tomato puree!”
I heart internet coinky-dinks.
What are you getting disproportionately giddy about at the moment?
Read MoreAdventures in frugal vertical gardening: salvaged planters
A few weeks ago, our next door neighbour with the gorgeous show house revamped his garden for summer. His deck is decorated like a room of the house (including an old vintage dresser, which looks fab with bedding plants draped out of the drawers and is currently topped with a birdcage and some matching framed photos) and he prefers to have just a few pots around the seating area rather than our overgrown scruffy (albeit veg-tastic) garden. As much as I like growing our own food, I do look at his garden wistfully sometimes – so lovely, so little upkeep! ;)
Anyway, so the guy with the great taste was tidying up his garden and at some point in his tidying mission, he decided he no longer wanted four wooden trough planters – he’d had them for a couple of years and they were looking past their best, so he dumped them on the (communal) bonfire heap at the bottom of our garden. I spotted the next time I was passing on the way into the woods with Lily-dog and mentally bagsied them – sure, they were a little past their prime but i) aren’t we all? and ii) they’re nothing a bit of TLC couldn’t fix.
I didn’t actually collect them until yesterday – but on closer inspection confirmed what I’d thought — a couple of bangs with a hammer (to reinsert some nails), a couple of supporting screws and a lick of paint and they’d be fine.


They’d got a bit damp in the recent rain so I let them dry in the sun for a while then wielding my hammer & screwdriver, did my minor fixes. The smaller trough was still in good condition so I just gave the wood a bit of a polish to freshen it up a bit. It’s not perfect but it’ll do as a small herb pot.

The three bigger ones, I cleaned up then slapped on a couple of coats of white acrylic primer. I didn’t want to paint all the way inside, just to roughly where I imagine the soil level will be.

I’d wanted some nice troughs for the balcony for a while – for salad and herbs right next to the kitchen door – and to maximise space, I decided to build another tiered planter stand thing. (The first one of those is proving very useful by the way – it’s currently filled with pots of different salad leaves.) I wanted it to be as simple as possible but the sides of the troughs were too angled to attach uprights to them – I could have attached them directly to the wall with brackets but prefer the flexibility of freestanding stuff where possible, so ended up building another shelved planter stand.

I did start with wider shelves, with room for extra pots on either side, but decided to make it narrower and neater so it would fit better on the balcony and be stronger. I have also added supports onto the bottom of each trough so they can be screwed onto the shelves to make them more stable/less likely to tip over – I just haven’t done that yet because I want to paint everything first. The narrower stand itself is stable but the individual troughs will be a bit top heavy.

The uprights are made from salvaged decking and the shelves from salvaged (due to being warped in parts) battens (both courtesy of John’s dad) – so structurally, it was completely free. I’m not sure where the primer came from (I suspect John’s dad brought that around too, it just appeared in our house) and it will need painting again — I have some leftover gloss paint in fun colours but I think I need exterior paint or an acrylic based paint for outside stuff (don’t I?) so I, gasp, might have to buy a little pot for that bit, unless I can scrounge some off someone else this weekend. Any colour suggestions by the way? (For context, the metalwork of the balcony it’ll stand on is painted black, the walls at that level are exposed Yorkshire stone and the window sills will be black when we get around to painting them.)
Still though, even if I have to buy a little paint, I’ll still be happy with the final cost and the finished item – it’ll more than pay for itself if it grows the herbs and salad I have planned. :)
Read More-
 Taking Stock – May 2015
-
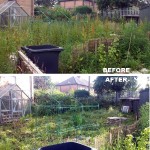
 Making a little more progress at the allotment
-
 Allotment, end of round 1 (ding ding)
-
 Yay, allotment!
-
 Taking stock – June 2014
-
 Do it better
-
 Stitching etc tips from the Knitting & Stitching Show
-
 No Spend November
-
My winter to-do list 2013
-
 Taking stock: a ‘what I’m up to in my absence’ meme
-
 Plummy solid square crochet blanket
-
 Attack of the Crochet Claw
- Jetpack plugin with Stats module needs to be enabled.
-
 My low-spend '11: buy less than 12 items of clothing in 2011
-
 Using up the glut: Marrow cake recipe
-
Cold smoking cheese - taste testing the first batch
-
Spicy marrow chutney recipe
-
 How I line dry clothes in winter: my top five tips
-
 Washing in winter: ideas for reducing laundry?
-
 Foraging for wild food: do you forage near roads?
-
Your favourite fiction books with simple living characters/themes?
-
 Wild plum/cherry plum jam recipe
-
 How I spent my Tuesday afternoon
-
 We *heart* books too (warning: picture heavy post!)
-
 Portion control
