

What are your favourite recipes to batch cook?
 I mentioned in passing the other week that we’ve got a bit more freezer space these days and I’m keen to fill it with homemade ready meals and good food, so there is no room for processed stuff (or vast quantities of ice cream) from the supermarket.
John and I don’t particularly batch cook but we do generally cook large portions of things – nearly everything that takes longer than, say, 20 minutes is made in double portions (so it’s two dinners for the two of us) but a pasta sauce or curry might be eight or ten portions (two fresh dinners for us, the rest frozen for future use). Making a large batch of pasta sauce or curry doesn’t take any longer than a small one but the leftovers only take a few minutes to reheat next time.
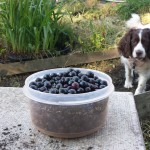
But then I hear about people doing proper en masse batch cooking and I feel like such a homemade ready meal amateur. For example, this wonderful lady managed to make 46 dinners for her family of four, from things that cost just $96 in a reduced-to-clear meets batch cooking extravaganza.
I’d like to start batch cooking more – making eight to ten portions of any one thing at a time – but I’d like a bit more variety — the aforementioned curry (usually keema & chickpea achar) and pasta sauces are great, as are soups and versatile bean chillis, but I’d welcome more ideas for a bit of a change, and also to have ideas in mind so I can take advantage of more reduced-to-clear type bargains.
Do you batch cook? Do you set aside an afternoon/evening every so often to do it or do you just do it as you’re going along? What are your favourite recipes?
Read MoreA year of The Really Good Life
Well what’dya know, it’s a year today since I started this blog!
My first posts were about growing salad leaves, pickling wild garlic seed pods (which is something I’ve been meaning to do again this year but haven’t got around to it), some bargain batch-cooked dinners and about getting our first chickens – and our first egg.

What’s happened in the last year?
- We got the chickens – and got more but then lost two. But still ate a whole lot of eggs.
- Made fresh pasta from scratch for the first time – a big deal for pasta lovers like us!
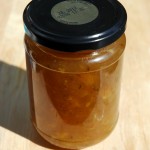
- Made my first jams & chutneys – a whole cupboard full

- Made things from wood
- Learnt how to make soap
- Assist John in making his ultimately explosive cider ;)
- Learnt loads about making cheese
- Cold-smoked cheese and other things – yum

- Baked a whole lot of new stuff
- Refined some of my favourite recipes while trying to write them up
- Added a new (small) room to the house – will post pics in a couple of weeks when it’s decorated
- Had a “no spend” almost-month and kept a spending diary since the start of this year – which has made me more conscious about casual spending
- Surprised myself by not buying any clothes for seven months and counting

- Had some growing successes in our first year here – and our second year is off to a good start
- Planted lots of fruit trees and bushes/li>
- Made lots of new internet friends :D

I think the main thing that’s happened in the last year though is that between writing about things on here (and getting feedback – thanks for all the comments, guys!) and reading about all the exciting things other people are doing (both in the comments here and on their own blogs), I’ve been inspired to try things I’ve long wanted to try and experiment with other things that I didn’t even know I wanted to try!
Basically, it’s been a really good year :D
Read MoreQuick tomato soup with chorizo and beans (recipe)
A common tip for people trying to eat less meat for frugal, health or environmental reasons is to use meat as a flavour not as an ingredient to add volume/bulk to the meal. I love chorizo for this purpose – the smallest pieces provide plenty of flavour. This soup doesn’t taste like a slice of neat chorizo, but the sausage adds a lot of depth to what is otherwise a pretty basic tomato soup.
Like our spicy tomato and lentil soup, this is a quicky and aside from the chorizo, is made from standard store-cupboard ingredients – so is a great last minute lunch soup. It’s not quite as frugal as the lentil one (because of the chorizo) but it’s still pretty cheap for something so easy and tasty :)

Quick tomato, chorizo and bean soup recipe
Makes 4-5 good lunch sized portions
Costs about £2 in total, or 50p a portion (would be cheaper using dried beans, they just need rehydrating first)
Ingredients
Splash of olive oil
An onion, finely chopped
A clove of garlic, minced
Chorizo – about 50g finely chopped or 10 pre-sliced slices chopped/torn up
A can of chopped tomatoes
About 300g (drained weight) pinto or borlotti beans
A litre of hot vegetable stock
3 tbsp of tomato puree
1 tsp mixed herbs
1/2 tsp paprika
1/2 tsp chilli flakes (optional!)
Ramsoms & Ricotta Ravioli Recipe (aka cheesy, spicy wild garlic ravioli)
Usually when I post recipes, they’re either long-time firm favourites or new things that I’ve made a least a few times to try different flavour tweaks. However these suckers took a good while to make and I can’t see myself finding the time to make them again before the wild garlic (Ramsoms) season is well and truly over, so I’m going to publish the recipe now after making them start-to-finish just once. They were yummy as they were :)

There is so much wild garlic in the woods behind our house that it seems rude not to use it as often as possible throughout the spring. We add it raw into salad, have it in mash/potato cakes for a colcannon-ish dish, use it as a pizza topping but mostly, have it on pasta — usually wilted with a little lightly fried chorizo and some olives. Yummo.
It goes so well with pasta, as a tasty spinach substitute, that I wanted to try making pasta with it – and this is the result: wild garlic ravioli. WG loses a lot of its fieriness when you cook it and the flavour here is quite subtle – which is why I served it with a sprinkling wild garlic seed pods too. Plus, they also look ace :)
Ramsoms & Ricotta Ravioli Recipe
(Yes, I like alliteration.)
Makes: 3 decent sized portions if that’s all you’re having; or 4 portions with meat/veg
For the pasta
225g of 00 grade pasta flour
2 large eggs
80-100g of wild garlic
pinch of salt
extra (plain or pasta) flour for dusting
For the filling
225g of ricotta
25g of parmasan
1/4 to 1/2 tsp of ground black pepper
1/2 tsp of ground nutmeg
1/2 tsp of chilli flakes
Finely chopped basil & oregano leaves (or about 1tsp of dried herbs)
To serve
About 2tsbps of wild garlic seed pods (about half a dozen flower heads)
olive oil
a knob of butter (optional)
Real Bread week: our favourite bread recipes
Apparently it’s Real Bread Maker week this week. I’m not sure why it’s not just Real Bread week, why it has to be all about breadmakers but either way, mmm bread.
When I left my last-but-one job I was given a juicer as a leaving present. As I hate juice, I swapped it for a bread maker. We probably made bread in it about a dozen times — admittedly a dozen more times than we would have used the juicer — but not enough to warrant it taking up a whole lot of space in our then-tiny kitchen. We just weren’t impressed with the bread from it – we tried a number of different recipes but none were impressive enough to be worth the effort. A few years ago, we gave the gadget to John’s sister and worked out how to make much better bread without it.
Aside from meal-centric breads like chapattis, naans and pizza dough, we tend to make three types of bread: yeast-based slow rise no knead bread, sourdough and soda bread.
Sourdough

The sourdough is by far the most labour intensive because in addition to the regular bread making stuff, we have to keep our starter alive all the time even though we don’t bake it that often. When we do make it, we use the Handmade Bakery’s “Yorkshire Leaven” and their pain de campagne recipes – the former uses a sourdough “production starter” which is left overnight before the bulk of the flour added, whereas the latter is fully mixed & kneaded then left overnight. The two different options mean we can pick the recipe which suits our schedule better – whether we have more time right then or will have more time the following day. Both result in a really tasty, substantial loaf – not like fluffy barely-there white bread from the supermarket but a real part of a meal.
Pros:
- Really, really tasty bread
- Minimal ingredients – just water, flour, a little salt & starter (which is flour & water with natural yeasts)
- Breads in theory last up to a week. Usually eaten well before that here!
Cons:
- A chore to keep the starter alive if not baked regularly
- Needs to be in a warm place during rise/proving times
- Needs to be started well in advance of eating
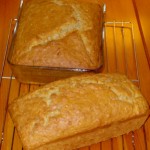
Slow rise no knead bread

In comparison to the sourdough, slow rise no knead bread is less flavourful – that’s not to say it’s not tasty in its own right, just it’s not so zingy. The texture is similar though – substantial with large air bubbles; you know you’re eating it, that’s for sure. It needs leaving overnight like the sourdough too but the actual involved-making time is minimal – time does the hard work so you don’t have to ;) It takes less than five minutes to mix the dough then it’s left for 12 hours or so, shaped (which takes no more than a minute), left to prove for a couple of hours then baked. And it uses only store cupboard ingredients – no pesky, needy starters. I’m willing to trade the sourdough zing for the easiness of this recipe most of the time. [Our slow rise no knead bread recipe]
Pros:
- Substantial, tasty bread
- Minimal ingredients – just water, flour, a little salt & yeast
- Takes less than five minutes to mix – no kneading! Then just a little shaping the next day before baking
- Breads in theory last up to a week. Usually eaten well before that here!
Cons:
- Needs to be started well in advance of eating
- Needs to be in a warm place during rise/proving times
- Best results using a cast iron casserole dish – can be expensive if you don’t have one
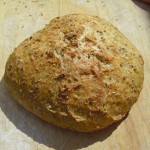
Super quick soda bread

Both the sourdough and slow rise breads are great but do require a lengthy wait and need to be somewhere warm for the duration (which isn’t always possible in our house). Soda bread is our favourite “need bread now” bread as it’s ready within the hour. It doesn’t need any kneading or a warm rising/resting environment either – just mix the ingredients together and bung it in the oven. I wouldn’t go as far to say it’s an acquired taste but it certainly does have an unusual flavour – not really a bread for sandwiches but great for with a hearty winter soup or with jam for a sweet treat. [Our soda bread recipe]
Pros:
- Super quick!
- Takes less than five minutes to mix – no kneading!
- Ready to eat within the hour
- No yeast so no need to keep it warm during rising/proving
- A light crumb with a sweet, soda-y taste
Cons:
- The taste is a little unusual – delicious once you’re used to it though
- Need to have more exotic ingredients that the others (milk! ;) )
- Not as long lasting as the other breads (eat within 2 days)
So those are our three favourite real breads – what are yours? Do you bake bread regularly? Do you use a bread maker?
Read MoreTiered plant stand made from scrap wood
Yesterday I mentioned I finished off my latest scrap wood creation – a plant stand thing.
I can’t remember whether I went looking for inspiration or whether I stumbled upon the idea while looking for something else but about a month ago, I got very excited about the idea of making a tiered plant stand thing which would allow me to double, triple or maybe even quadruple the amount of plant pots I could have in any one area.
There are a few different sorts out there, with different supports and shelves, and I collected a range of pictures together to come up with my own design – one that would be versatile (long shelves not just trays for shelves – although that would use a lot less wood) but most critically, easy to make with my less than stellar woodworking skills. And this is what I came up with:

If it looks wonky, it’s because the floor there is uneven, I spent AGES getting everything level! It was a bit of a pain working out all the angles – I had to use MATHS! ;)

It’s pretty sturdy – supported against the wall by both the top shelf supports and the back batten of the top shelf. I made the side bits – from salvaged decking John’s dad brought over and some joiner’s off-cuts from our woodstore – a few weeks ago but couldn’t find any lengths for the shelves. Then I found six 18mmx38mmx1800mm battens in the garage yesterday, which worked perfectly. Since the wood is all a bit mismatched and it’s not all protected, I think I’m going to paint it with some leftover-from-decorating paint.
The shelves are about 90cm/3ft long, so I’ve now got 270m/9ft of linear growing space in less than a metre of ground space – and all of it raised off the ground which will hopefully deter slugs even the tinest bit!
As it was a bit of an experiment, I’m rather happy with it – another freebie for the garden – hurrah for scrap wood! This stand will probably live where it is now – underneath the office window – but I might make another one for the balcony next to the kitchen for easy-grab salad & herbs.
Read MoreAbout Me
 I'm Louisa and I live a Really Good Life. I grow, I craft, I cook and I make the most of what I've got instead of forever craving more.
Read more the site on the About page, or browse through the categories below.
I'm Louisa and I live a Really Good Life. I grow, I craft, I cook and I make the most of what I've got instead of forever craving more.
Read more the site on the About page, or browse through the categories below. -
 Taking Stock – May 2015
-
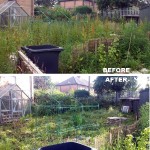
 Making a little more progress at the allotment
-
 Allotment, end of round 1 (ding ding)
-
 Yay, allotment!
-
 Taking stock – June 2014
-
 Do it better
-
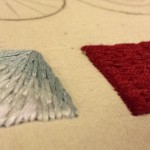
 Stitching etc tips from the Knitting & Stitching Show
-
 No Spend November
-
My winter to-do list 2013
-
 Taking stock: a ‘what I’m up to in my absence’ meme
-
 Plummy solid square crochet blanket
-
 Attack of the Crochet Claw
-
 Using up the glut: Marrow cake recipe
-
Spicy marrow chutney recipe
-
 Wild plum/cherry plum jam recipe
-
 Easy marrow and ginger jam recipe
-
 No omelettes allowed: my five favourite recipes to use up lots of eggs
-
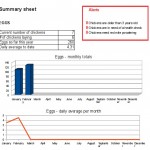 My chicken keeping spreadsheet
-
Plummy solid square crochet blanket
-
 Spicy plum chutney recipe: plum & chilli jam
-
 Foraging for wild food: do you forage near roads?
-
 Upcycle an old duvet cover into a frugal bean bag
-
 The wonder that is slow rise bread
-
 How I line dry clothes in winter: my top five tips
-
 My low-spend '11: buy less than 12 items of clothing in 2011
-
Cold smoking cheese - taste testing the first batch
-
Using up the glut: Marrow cake recipe
-
How I line dry clothes in winter: my top five tips
-
Spicy marrow chutney recipe
-
 Washing in winter: ideas for reducing laundry?
-
Foraging for wild food: do you forage near roads?
-
Your favourite fiction books with simple living characters/themes?
-
 How I spent my Tuesday afternoon
-
 We *heart* books too (warning: picture heavy post!)
-
 Portion control
-
Baking things that'll last
